
Recommended Services


Supported Scripts


A modded server runs smoothly when its files, settings and player clients are in sync. To learn how to add mods to a dedicated server, install server-compatible files, configure the game’s mod settings or launch options, then restart the server. Exact steps vary by game, and some mods also need to be installed on players’ computers.
Copying files is only part of the job. An incorrect folder, missing dependency or mismatched mod version can prevent launch. A careful setup makes these problems easier to identify and gives you a clear way to roll back changes if a mod causes issues.
This guide covers installing and applying mods, adjusting mod and save settings, troubleshooting compatibility, and aligning client and server mod lists. You’ll also learn what to check before restarting, so you can make changes methodically and avoid unnecessary disruption.
Key Takeaways
- Stop the server before changing mod files, then restart it to apply the update.
- Use the game’s mod settings or launch options to specify which mods the server should load.
- Check that each mod is built for dedicated servers and install any required dependencies.
- Keep player and server mod versions aligned, especially for games that require matching client mods.
- Make changes methodically so you can identify which mod or setting is behind a launch or compatibility issue.
Applying mods by restarting the server
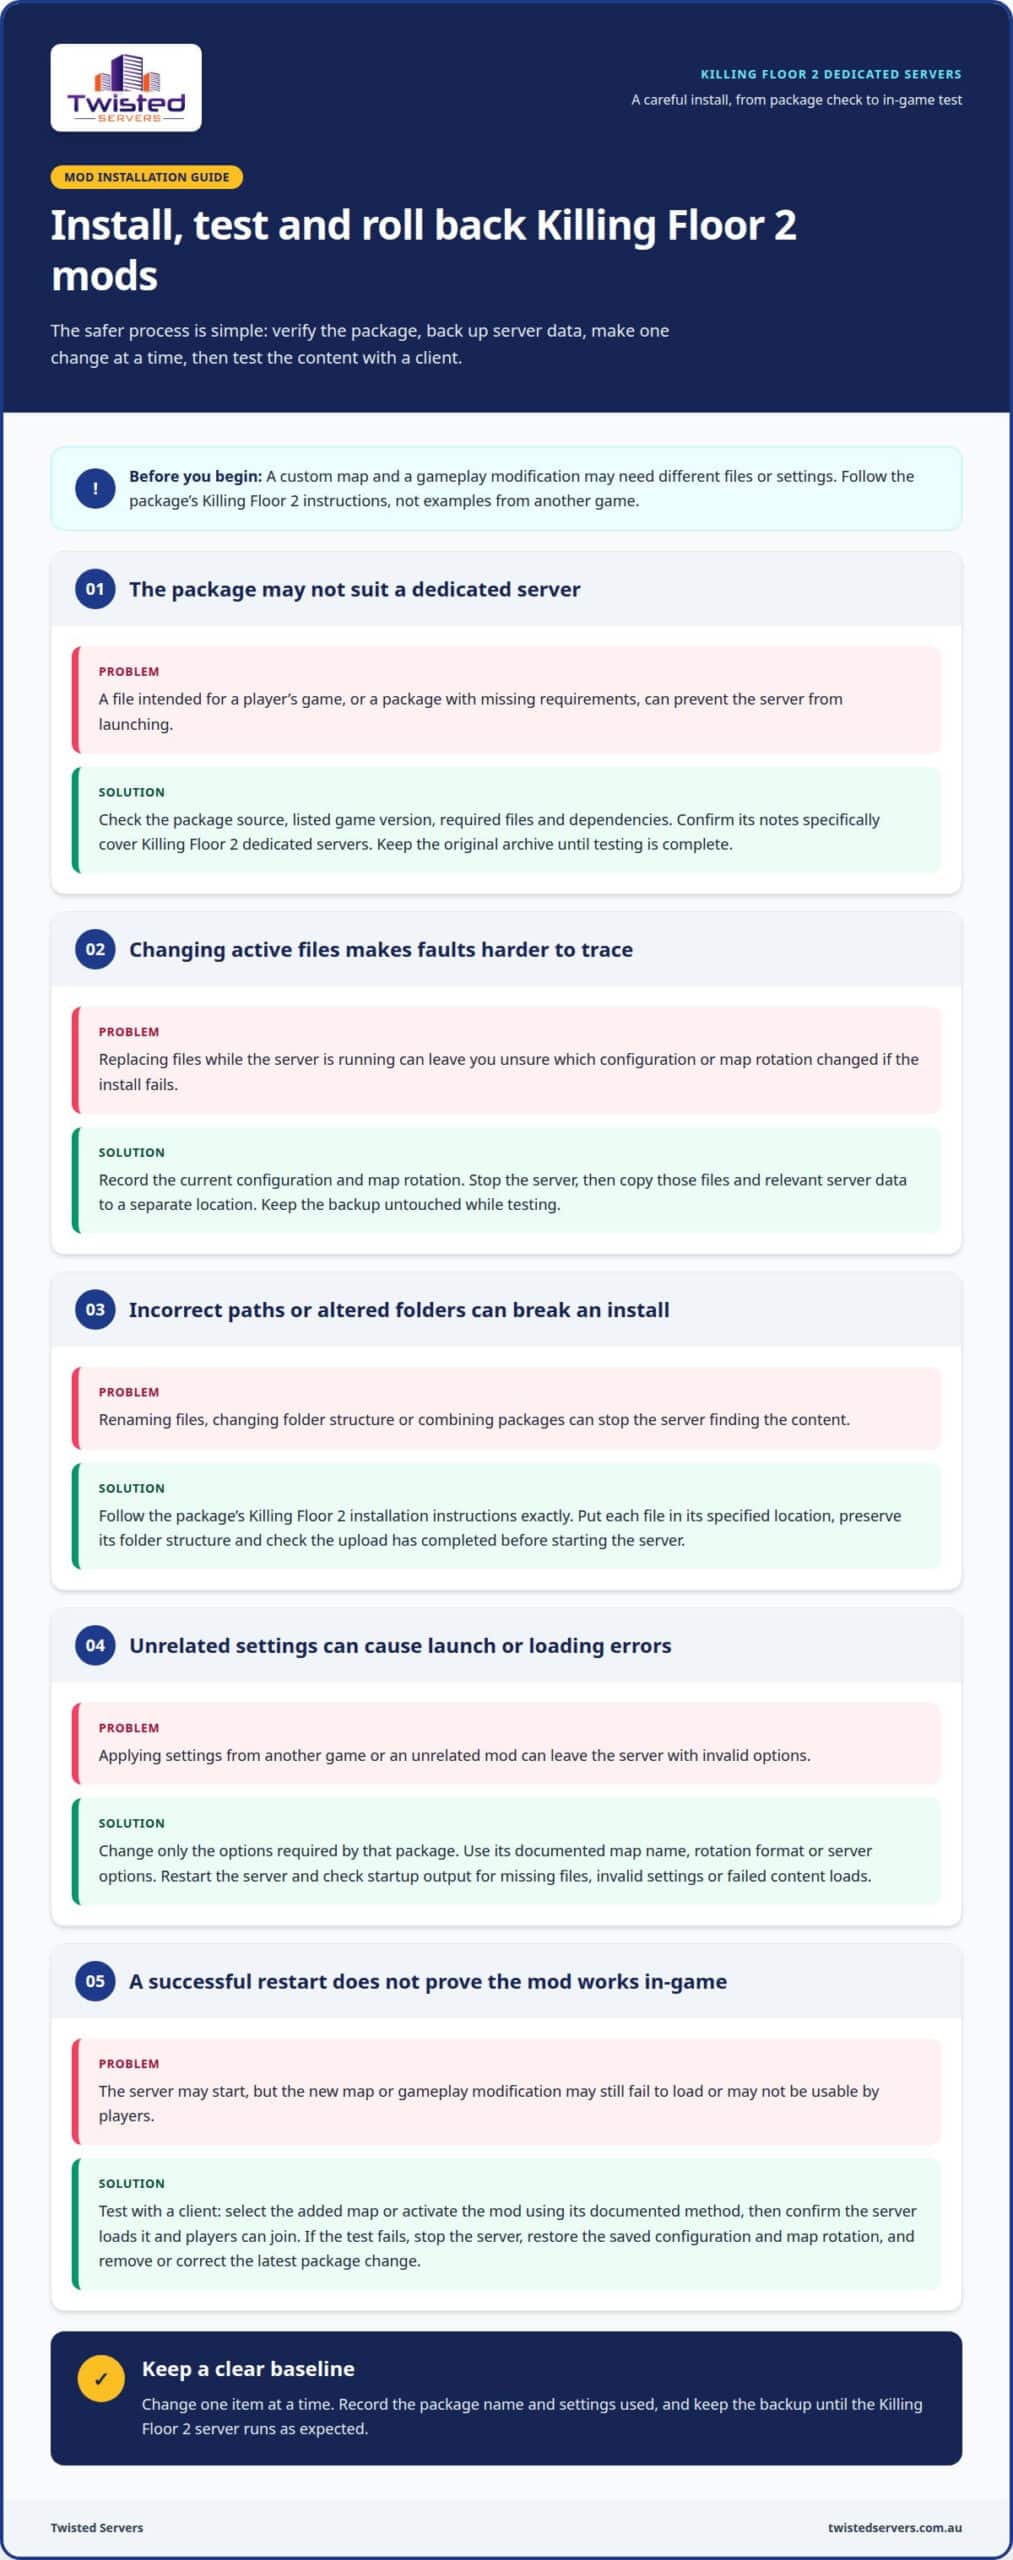
- Identify the Killing Floor 2 content you’re adding. A custom map and a gameplay modification may need different files or settings. Read the package’s installation notes and confirm they name Killing Floor 2 dedicated servers. Don’t assume a file designed for a player’s game works on the server.
- Check the package source and contents before uploading. Confirm its listed game version, required files and dependencies, and keep the original archive until testing is complete. If the instructions describe a client-only change, don’t use it as a server installation package.
- For a provider-hosted server, use the file access and restart controls available for your server. For a self-run server, access its files on the machine running Killing Floor 2. Both approaches need the correct server files and game-specific instructions.
- Stop the Killing Floor 2 server before changing files. A clean stop prevents the running process from using files during replacement. Record the current configuration and map rotation first, so you can compare settings after installation or restore them if the change fails.
- Back up the server files before installing a package. Copy the current configuration, map rotation and relevant server data to a separate location, and leave that copy untouched while testing. For hosted servers, use the available file access; on a self-run machine, save the copy outside the active server directory.
- Follow the package’s Killing Floor 2 installation instructions exactly. Place each file in the specified location and preserve its folder structure. Don’t rename files or combine separate packages unless their instructions say to do so. Check that the upload completed before starting the server.
- Update only the settings required by that package. For a custom map, use the map name and rotation format stated in its instructions. For a gameplay modification, apply its stated server options. Avoid copying settings from another game or from an unrelated Killing Floor 2 package.
- Restart the server after changing files or configuration. Watch the startup output for missing files, invalid settings or failed content loads. If the server doesn’t start correctly, stop it before editing further. Change one item at a time to isolate the cause.
- Test the new content with a client before inviting the full group. Select the added map or activate the mod using its documented method. Confirm that the server loads it and players can join. A successful restart alone doesn’t prove the content works in-game.
- If testing fails, restore the saved configuration and map rotation, then remove or correct the latest package change. Keep the backup until the Killing Floor 2 server runs as expected. Record the package name and settings used, so the next update starts from a clear baseline.
Configuring server mods and save settings
Keep mod configuration separate from world progress. Use the game’s settings format and change only options required by the installed mod.
- Locate the configuration files for the game server you run. Read the mod’s instructions to identify which settings it needs, then edit those settings rather than unrelated server options. File names and formats differ between games, so don’t apply another game’s configuration examples to Killing Floor 2.
- Record current values before changing a setting. For example, note the existing map rotation or gameplay options if a mod instructs you to alter them. Change one setting at a time, save the file in its existing format, and check spelling and punctuation so the server can read it.
-
Configure the Workshop directory
Confirm that the game and mod use a Workshop directory before setting one. Follow the mod’s documented directory option and use the exact path format it expects. Don’t assume a Workshop folder, launch option or settings-file key from another game applies to Killing Floor 2. After saving the setting, check that the server can read the target directory.
- Keep mod identifiers distinct from display names. If the instructions provide a package identifier, enter that exact value in the supported configuration field. Don’t substitute a folder label or shortened title. If the game uses another identifier system, follow its format instead of adding an unsupported
PackageNamefield. - Separate persistent game progress from mod configuration. A settings file controls how the server loads options; a save or world file holds player progress when the game uses one. Don’t edit save data to change a mod setting. Check the mod notes for effects on existing progress before applying changes.
-
Update or remove mods while keeping saves
Read the update notes before changing a mod that interacts with saved progress. Apply only the documented configuration changes and leave save files untouched during the edit. If removing a mod, check its instructions for effects on existing progress. Removing files and changing a setting are separate actions.
- Review the server settings after each change. Compare saved values with your notes and confirm the file remains readable. If the server ignores an option, check its spelling, location and format against the game’s instructions. Avoid adding guessed settings, which make configuration problems harder to trace.
- Keep a clear record of mod-related settings, identifiers and the reason for each change. This helps you distinguish a configuration change from an update to saved progress. For a Killing Floor 2 server, use only settings documented for its server software and the specific mod, not examples written for Palworld or another title.
Troubleshooting compatibility and dependencies
Diagnose one failure at a time. A clear test helps distinguish package, configuration and connection problems.
- Check the game build and the mod’s stated requirements first. Compare the installed server version with the versions named in the mod’s release notes. If they differ, use a compatible package or update the server and mod together. Don’t assume a mod works just because its title matches the game.
-
Check mod compatibility with the server
Read the mod’s documentation for dedicated-server support, operating system limits and required files. If the mod provides a server-specific package, use that package rather than a client download. For a Killing Floor 2 server, only rely on instructions that explicitly apply to Killing Floor 2; don’t transfer settings or compatibility claims from another title.
- Use startup output to find the first actionable error. A missing file, rejected setting or failed dependency can trigger later errors. Note the first relevant message, compare it with the mod’s installation notes, then address one cause before restarting. This makes it easier to confirm whether the fix worked.
-
Configure mod load order and dependencies
Follow the creator’s stated load order and dependency list. Install prerequisites before the mod that requires them, using the documented package names and versions. If no order is specified, don’t invent one: test the package on its own, then add dependent mods one at a time.
- Check licensing and cost in the mod’s own terms. Some mods are free, while others may be paid. The creator’s licence sets the rules for use, redistribution and server operation. Don’t assume a free download permits repackaging or sharing its files with players.
- Download mods from the game’s recognised mod platform or the creator’s published channel. Before installing, compare the listed game version, author, update notes and dependencies. Avoid re-uploaded archives with unclear origins, as their contents may differ from the creator’s package.
- Monitor performance and stability after adding a mod. It may increase server workload, conflict with another mod or cause crashes. Test it separately and review server behaviour before adding more. Treat unfamiliar files cautiously, and remove a change that produces repeated errors.
- For Australian communities, consider server location alongside access and configuration needs. Local infrastructure can reduce latency for nearby players, but routing, internet providers and player location also affect connections. Choose a setup with the file access and control your mod process requires.
Copying a Satisfactory client mods folder directly to a dedicated server doesn’t work because client-compiled files are incompatible with dedicated servers.
Keeping client and server mods consistent
Match installed mods to the game’s server requirements. For Satisfactory, players need the same mods as the dedicated server.
- Record every active mod before making changes. Note its name, package identifier, version and dependencies. For example, list Satisfactory server packages separately from client-only add-ons. This inventory gives players a shared reference and helps identify mismatches after updates.
-
Install matching mods on the server
Install the server-compatible package for each mod on the dedicated server. For Satisfactory, use files compiled and packaged for dedicated servers, not copied client files. Record the package version and any prerequisites. Keep server-only files in their required locations, since Palworld mod types such as UE4SS, Lua, PalSchema, LogicMods and Paks use different deployment directories.
- Compare the server’s active configuration with your inventory. In Palworld, check that each intended
PackageNameappears in the active mod list. For ARK: Survival Ascended, compareActiveModsentries with the IDs supplied through the-modslaunch argument. Matching identifiers help ensure the server loads the set players expect. -
Install matching mods on players’ clients
Give every Satisfactory player the same mods as the server. Ask players to match package versions and dependencies, not just mod names. Packages with similar names can still differ by version or release. After an update, have players update their copies before joining, then compare their mod lists with the server inventory.
- Use one agreed distribution method for your group. For a Steam-launched server, enter mod launch options in the server’s Options menu, in the last text bar. Share the exact mod IDs and launch configuration with administrators. A precise written list is more reliable than screenshots or memory.
- Manage Satisfactory server files remotely through network filesystem access or FTP/SFTP. Keep the server package list available to whoever maintains player installations. Don’t distribute client-compiled files as server packages: the dedicated server can’t use them, even when players have them installed.
- Test a change with a small group before announcing it. Have each tester compare the client’s visible mod list with the server list. Record any missing package, version difference or dependency error. Fix that mismatch first rather than removing several mods and losing track of the cause.
- Repeat the comparison after updates. Check the server inventory, configuration entries and each player’s installed packages. For Palworld, distinguish mod types and where they’re deployed. For Satisfactory, confirm server-compatible builds are still in use. A simple change record makes future connection issues easier to troubleshoot.
How to Install Mods on Servers and Player Clients
Install the server package and player copies as separate tasks. The correct files depend on the game and mod type.
- Write down each mod’s exact name, version and package identifier. Make a shared list before installing anything. For example, keep Satisfactory server packages separate from mods intended only for players. Use this list to compare server files, player installations and later updates.
- Check the mod’s instructions for its server installation path. Palworld mod types include UE4SS, Lua, PalSchema, LogicMods and Paks, with different deployment directories. Place each package in its required location. Don’t assume that a client download belongs in the server’s mod folder.
- Use server-ready files for Satisfactory. Dedicated-server mods need packages compiled for the server format; client-compiled files aren’t compatible. If managing files remotely, use network filesystem access or FTP/SFTP to place the correct package on the server.
- Set the server’s mod configuration to match its installed files. For Palworld, list the intended package names in the server settings. For ARK: Survival Ascended, use mod IDs in
ActiveModsand the server’s-modsargument. Keep the identifiers consistent across both ARK settings. - Install client copies according to each mod’s player instructions. Don’t copy entire server folders onto players’ computers. Server and client packages can differ, particularly in Satisfactory, where server-compatible files use a dedicated format. Tell players which mod versions and dependencies the server uses.
- For a Satisfactory dedicated server, have every player install the same mods as the server. Compare package names and versions, not just display titles. If a player has an older version, update that client before joining. Keep a current shared list so new players can prepare.
- For Steam-launched servers, enter mod launch options in the server’s Options menu, in the last text bar. Check the game’s expected argument format before saving. For ARK: Survival Ascended, the
-modsargument takes mod IDs as a comma-separated list. - Test access with a player account after installation. Ask the player to join and note any missing-mod message or version mismatch. Compare the report with the server’s active configuration. Change one package at a time, then repeat the test to isolate the cause.
- Record every change after a successful test. Note the mod name, package identifier, version and whether players need an update. This helps administrators apply changes consistently across the server and each client. It also gives returning players clear instructions after a mod update.
If you’re setting up a modded community server, explore Australian game server hosting options for a hosting setup suited to multiplayer play.
Twisted Servers: Game Server Hosting
Twisted Servers offers Game Server Hosting for communities that want to run multiplayer sessions without managing a server on their own computer. With a modded server, you’ll still need to align the game’s server files, settings and player mods. Hosting provides a separate place to manage those files and configuration.
For more direct control over the operating system and server setup, consider whether VPS Hosting or Dedicated Server Hosting better suits your needs. The right option depends on how much configuration you want to manage and which server software you plan to run. Twisted Servers provides hosting options for Australian gamers and organisers.
Contact Twisted Servers to discuss hosting for your game community.
Plan your next mod update with confidence
Make your next change deliberate. Choose a mod that adds clear value for players, then agree who will manage its files, settings and client updates. Keep the change focused so your group can assess its effect before adding another. A shared record also helps new players understand the server setup.
Knowing how to add mods to a dedicated server is only part of maintaining a modded community. The ongoing task is keeping the setup manageable as players’ interests and mod versions change. Set a simple process for proposing, testing and communicating changes. This helps players enjoy a consistent experience without scrambling at every update.
If you’re ready to discuss a hosting setup for your gaming community, contact Twisted Servers for help. Take the next step at a pace that suits your group, and build your modded server with care.
Frequently Asked Questions
How do I add mods to a dedicated game server step by step?
Install mods according to the game’s server-specific instructions, then test the setup before inviting players. First, identify the game version and mod requirements. Add server-compatible files and required settings, then restart. Join with one client and confirm the mod works in-game. Keep a change record so you can trace problems to a specific file or setting.
How do I check whether a mod is compatible with my game server version?
Compare the mod’s stated game version and server requirements with your installed server build. For Palworld, server-side mods need a Windows dedicated server and "IsServer": true in the InstallRule section of Info.json. For Satisfactory, confirm the download is packaged for dedicated servers. After a game update, recheck mod requirements before updating the server or its mod files.
What are common problems when adding mods to a dedicated server, and how do I fix them?
Common causes include an incorrect folder, missing dependency, unsupported server package or mismatched client version. Check the startup output for the first reported error, then compare settings and installed files with the mod’s instructions. Fix one issue at a time and restart to test the result. If the server crashes after a Palworld mod change, stop it and restore your separate save backup before further testing.
Disclaimer
Game titles, trademarks, logos and related assets are the property of their respective owners. Twisted Servers is an independent hosting provider and is not affiliated with or endorsed by the developers or publishers of the games mentioned unless otherwise stated. Information is provided as a general guide and may change as games, software and hosting services are updated.

