
Recommended Services


Supported Scripts


A dedicated server setup checklist should document network capacity and DDoS mitigation thresholds, with capacity stated in Tbit/s and the threshold in Gbit/s. These figures give you a practical starting point for evaluating network protection before launch.
It’s easy to focus on processor and memory specifications, but a server also needs compatible software, sensible security controls and a reliable recovery route if normal access fails. Gaps in any of these areas can complicate launch or make an outage harder to resolve.
This checklist covers key pre-launch checks for dedicated servers in Australia, whether you’re preparing a game server for your community or a server for business use. It covers network protection, operating-system and software compatibility, account and firewall security, storage health, backups and emergency access. Each item explains what to verify and why it matters, helping you make informed setup decisions before going live.
Key Takeaways
- Get network capacity and DDoS mitigation thresholds in writing, then plan DNS changes and the cutover together.
- Match the operating system and server software to your application, and set a clear process for updates.
- Review firewall rules and account access so only necessary services are exposed.
- Choose a storage layout that suits your workload, and monitor disk health and available space.
- Test key-based login and your recovery route before launch, so you can regain access if normal administration fails.
Is the network and DDoS protection actually specified?
Choose hardware based on your game server software, expected workload and performance benchmarks. An example dedicated-server order specifies an AMD EPYC processor and 128 GB of RAM, but those specifications aren’t a universal fit. Test the planned configuration against benchmarks set before implementation; the Reserve Bank of Australia also recommends setting benchmarks before testing systems or services.
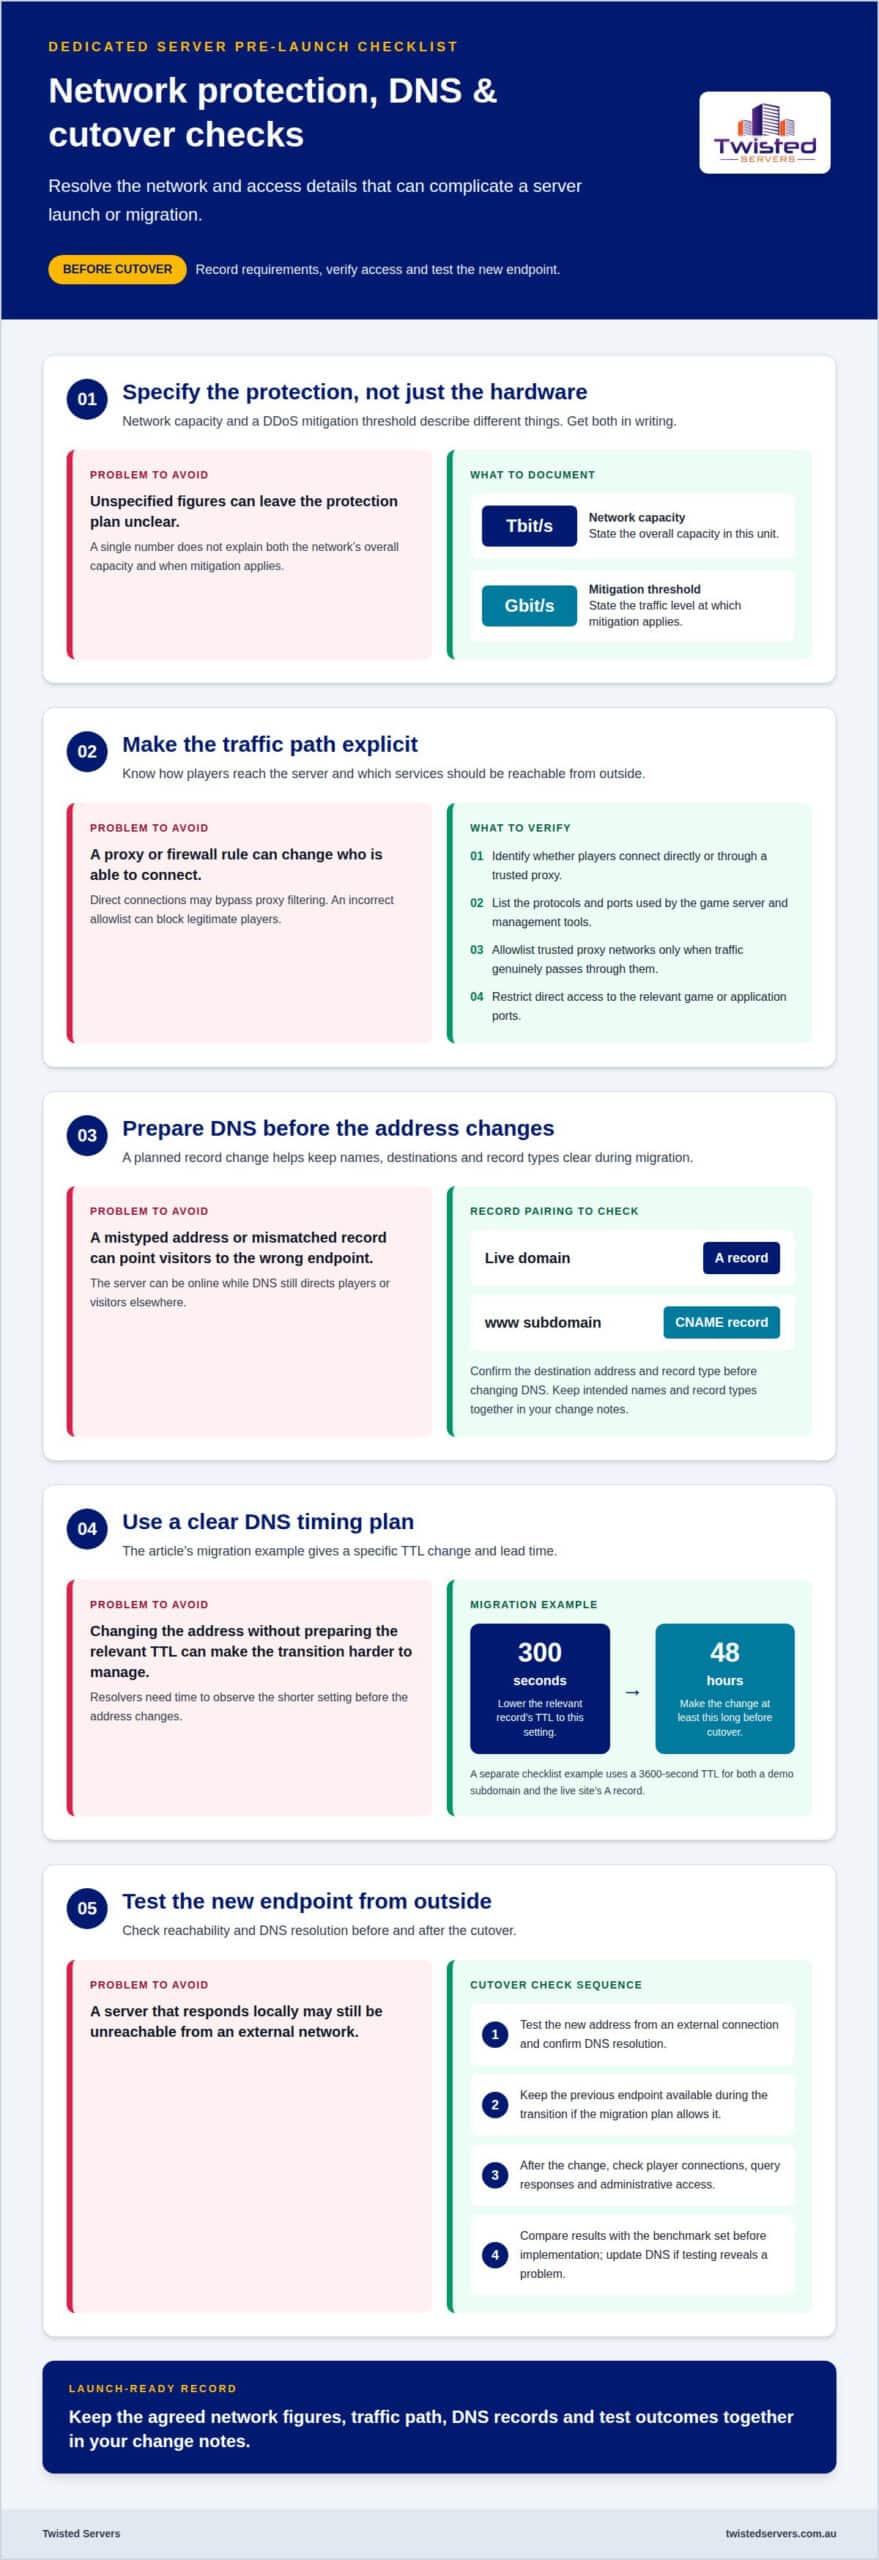
Get network capacity and DDoS mitigation thresholds stated in writing. Capacity should be expressed in Tbit/s, while the mitigation threshold should be expressed in Gbit/s. These figures describe different things: overall network capacity and the traffic level at which mitigation applies. Ask for both and record the agreed figures alongside your server’s active network requirements.
- Confirm the game traffic path: identify whether players connect directly or through a trusted proxy.
- Document required traffic: list the protocols and ports used by the game server and its management tools.
- Test reachability: attempt a connection from an external network after applying firewall rules.
- Record the outcome: note which services respond and which should remain private.
Plan DNS before moving an active service. A common migration approach is lowering the relevant record’s TTL to 300 seconds at least 48 hours before cutover. This gives resolvers time to observe the shorter setting before the address changes. The checklist example uses a 3600-second TTL for both the demo subdomain and the live site’s A record.
For a website connected to the server, prepare an A record for the live domain and a CNAME record for its www subdomain. Confirm the destination address and record type before changing DNS. A mistyped address or mismatched record can send players or visitors to the wrong endpoint, even when the server is online.
Allowlist trusted proxy networks only if your traffic genuinely passes through them. Add the proxy address ranges to the origin server’s permitted sources, then restrict direct access to the relevant game or application ports. Otherwise, direct connections may bypass proxy filtering, while an incorrect allowlist can block legitimate players.
Before cutover, test the new address from an external connection and confirm DNS resolution. Keep the previous endpoint available during the transition if your migration plan allows it. After the change, check player connections, query responses and administrative access. Compare the results with your pre-set benchmark, then update the DNS record if testing reveals a problem.
Use the checklist’s record pairing as a reference when reviewing DNS entries: confirm that the live domain has an A record and www has a CNAME record. Keep the intended names and record types together in your change notes, so you can check the configuration before making the change.
Operating system and software compatibility
Choose an operating system supported by both the game server software and its required dependencies. An acceptance record can name Ubuntu 24.04, but that version is an example, not a universal choice. Check the game’s server documentation for supported operating systems, required libraries and installation method. Match those requirements to the server’s infrastructure before installing anything, because incompatible dependencies can prevent startup or affect gameplay.
Record the exact software versions used for the initial build, including the operating system, game server files, runtime components and required management tools. This baseline helps when investigating failed updates or unexpected behaviour. Document installation sources and configuration changes, too, so a rebuild follows the tested setup rather than relying on memory.
- Confirm operating-system support: match the game server’s documented requirements to the planned operating system, because unsupported environments can stop installation.
- List required dependencies: record libraries, runtimes and tools before setup, because missing components can cause errors at launch.
- Check version compatibility: compare the server software version with required game files and add-ons, because mismatches can prevent connections.
- Keep a configuration record: save key settings and installation steps, because a known baseline makes troubleshooting clearer.
On Ubuntu, refresh the package list before upgrading installed packages. Run apt update, then apt upgrade to apply available updates from configured sources. Review the proposed changes before confirming them, particularly on a live server. A package change can affect a runtime or service the game server depends on.
Set a routine for reviewing operating-system and software updates weekly. Automate security updates where possible, while scheduling broader changes around the server’s maintenance plan. Note security fixes separately from game server updates. This makes it easier to identify which change preceded a fault and investigate or reverse the relevant update.
Test updates in a controlled environment before applying them to an active server, especially if the game uses plugins, mods or custom configuration. After updating, launch the server, review its startup output and connect with a client to test expected functions. A successful package installation alone doesn’t prove that the game process works or that add-ons remain compatible.
Before launch, keep a short acceptance record listing the operating system, package update date, server software version and test result. Repeat the checks after significant changes. If an update changes a required library, for example, note whether the server starts and a test connection succeeds. This record gives administrators a practical reference when maintenance affects the live setup.
Security audits and firewall reviews
Start with a written inventory of services, accounts and firewall rules. For each service, record its purpose, owner and required access. This creates a baseline for reviewing changes before launch and spotting unnecessary exposure later. Include the game server process, remote administration, monitoring tools and any database service. A clear inventory also helps distinguish expected connections from unexpected ones.
The standard SSH port is port 22, according to the Internet Assigned Numbers Authority. Record whether SSH is required and which sources can reach it. A customer-facing application may need public HTTPS access through port 443. By contrast, publicly accessible port 3306 is an exposure when there’s no approved requirement. Review each open port against the service that needs it.
UFW provides a straightforward way to apply host firewall rules on Ubuntu. Its default behaviour allows outbound connections and blocks inbound ones. Before enabling it, add an allow rule for SSH access. Otherwise, a remote administrator could lose the connection needed to manage the server. If SSH uses its standard port, allow the required SSH traffic first, then enable UFW.
- List required services: record each public-facing game, web or administration service and its purpose.
- Restrict remote administration: limit SSH access to trusted sources where practical.
- Review database access: keep database ports private unless an approved application needs external connections.
- Test after changes: confirm permitted connections work and unnecessary access is blocked.
Run a security audit monthly and review firewall rules quarterly. Compare the live configuration with your service inventory during each audit. Remove rules for retired software, old test environments or temporary administration access. Confirm that each remaining rule specifies a service and permitted source. This helps catch permissions left behind after a game server or supporting tool changes.
Test firewall changes from a separate connection, not just an existing administrator session. Check that the game server remains reachable through its required services while private administration and database services stay restricted. After changing UFW rules, inspect their active state and confirm the intended rule order. Record the date, change and test result so the next review can identify what changed.
Repeat these checks after installing a service or changing its software version. A new component may introduce another listening service or change access requirements. Compare its documented needs with the current firewall inventory before allowing traffic. This keeps rules aligned with the server’s actual role instead of leaving broad access in place for convenience.
Storage layout, RAID configuration, and disk health
Plan storage around the game files, active world data, logs and backups. Keep each category’s purpose clear in your configuration, so growth or cleanup decisions don’t affect unrelated files. A production database example uses two SSDs in RAID 1, which mirrors data across both drives. Mirroring supports continuity after a drive failure, but it doesn’t replace separate backups.
No single storage configuration answers every Australian privacy, data residency and cybersecurity question. The right controls depend on the data you hold, who can access it and the obligations that apply to your organisation.
A sample order specifies two enterprise SSDs, each with 1.92 TB of capacity, while an acceptance record specifies mirrored SSD storage. Treat those as examples, not universal requirements. Match drive capacity and redundancy to your workload, then record the layout and who owns maintenance, backup decisions and recovery tasks.
- Check drive layout: confirm the operating system, game files and persistent data use the intended volumes.
- Confirm RAID status: make sure the array reports healthy, and document its configuration.
- Track available space: schedule daily automated disk-usage checks and alerts at 80% and 90% capacity.
- Review drive health: inspect storage status and system logs for errors, then investigate warnings promptly.
A disk reaching 95% capacity can cause application crashes. Set alerts before space becomes critical, and identify which files can be archived or removed safely. For game servers, avoid deleting world data or configuration files as a quick fix. Confirm the file’s purpose and preserve a recovery copy before changing it.
If the server runs Linux, install and configure Fail2Ban to monitor authentication logs. Its default configuration blocks an IP address after 5 unsuccessful login attempts, with a default blocking duration of 10 minutes. Review the monitored log paths and jail settings, because custom services may require different configuration.
For a Laravel application, configure Horizon to monitor its queue workers and confirm they start after deployment. Check the application’s queue configuration and logs, then test a representative job. Horizon is for Laravel queue management, not game server processes, so leave it out of a game-only build.
Set PHP and MySQL according to the application’s documented needs. An example Ansible playbook sets PHP’s maximum upload size to 30 MB. For MySQL, review database access, credentials and storage location, then test application connectivity without exposing database access unnecessarily.
When choosing a server provider, consider Australian location, written storage specifications, network protections, and clearly assigned responsibility for maintenance and recovery. Before launch, test the application under representative activity. Monitor disk use, storage errors, logs and service response against benchmarks set beforehand. Record the results and resolve failures before opening access to players.
Administrative and emergency recovery access
Plan for losing your usual connection before the server goes live. An outage at 3am can leave players waiting while you troubleshoot remotely. Record the recovery route, required credentials and person responsible for each action. Keep the instructions somewhere accessible without logging in to the affected server.
Use SSH key authentication instead of password authentication for server administration. Before disabling password login, open a separate session and verify that the key works. Keep the existing session active while testing the new connection. If the key fails, you can use that session to restore access without locking yourself out.
- Test key access: connect with the intended administrator account and confirm the expected permissions.
- Keep an alternate route: document the available emergency console or recovery method.
- Limit account access: remove former administrators and avoid sharing personal credentials.
- Record the action: note access changes and recovery tests in the server’s operating record.
Root access gives full control over the operating system and installed applications, so avoid using the root account for routine work. Create an individual administrator account for each operator and grant only the permissions their tasks require. A game moderator who manages player settings, for example, doesn’t necessarily need operating-system administration access.
Store recovery credentials securely and separately from the server. Make sure an authorised colleague can locate them if the primary administrator is unavailable. Document how to access the server’s management interface, where recovery keys are held and who can approve access. Don’t put private keys or passwords in an ordinary configuration file.
A backup is useful for recovery only if its contents can be restored. Schedule a full backup restore test quarterly, using a separate environment where possible. Confirm that the restored files are readable and that the game server or application starts. Record the steps, any errors and the time needed to return the service to a usable state.
Review backup logs weekly, too. Confirm that recent jobs completed and the expected files appear in the backup location. A successful job message doesn’t prove that every required world, configuration or database file was included. Compare the backup contents with the server’s documented data layout, then resolve missing or failed items before relying on that copy.
Before launch, rehearse a recovery scenario: lose normal SSH access, use the documented alternative and confirm the service can be restored from backup. Keep the procedure current after account, key or software changes. A clear recovery record turns an unexpected access failure into a sequence of known steps instead of guesswork during an outage.
Twisted Servers: Dedicated Server Hosting
Twisted Servers offers Dedicated Server Hosting for admins who want a dedicated environment for their game or application. It’s a natural next step when you’ve defined the operating system, software, network access, storage and recovery needs, and want hosting suited to that setup.
If you’re running a supported multiplayer game, Game Server Hosting may better match your requirements. VPS Hosting and Web Hosting are other options for different workloads. Choose the service that fits what you’re launching and how you plan to manage it.
For help considering your hosting needs, contact Twisted Servers.
Set your server up for its next stage
Launch is the start of learning how your server works for its community. Once players are active, gather feedback about connection quality and gameplay, then prioritise changes that address recurring issues. This provides a grounded way to plan improvements without reacting to every isolated report.
Keep your dedicated server setup checklist as a reference when planning future changes. Revisit the project’s goals and decide which improvements matter most to the people using it.
Ready to discuss what comes next? Start a conversation with Twisted Servers. Your next step can be a clearer plan for the server you want to run.
Frequently Asked Questions
What operating system and software should I install on a dedicated server?
Choose an operating system supported by the game server’s current compatibility notes, then record its release and required runtimes in a deployment manifest. List optional mods and administration utilities separately so you can assess their impact individually. Your dedicated server setup checklist can include this manifest as a reference. Also record each component’s licence terms and approved source before deployment.
How do I configure networking, DNS, IP addresses, and firewall rules?
Map each hostname to the service players need, and identify who controls the DNS zone and IP allocation. If IPv6 is enabled, confirm the game service listens and routes over IPv6 before publishing an AAAA record. Keep player-facing names separate from administration names to reduce the chance of exposing management interfaces through a public hostname. Record who can change DNS entries and how those changes are approved.
What security hardening steps should I complete before launch?
Remove sample files and default configuration values that expose example credentials or debug settings. Store secrets outside publicly served directories, restrict access to the service account and avoid putting credentials in shared scripts. Review the game process’s logs, too, as they may contain tokens or connection strings. If a secret is exposed, treat it as compromised and replace it rather than merely deleting the visible copy.
How do I set up backups, monitoring, and disaster recovery?
Set recovery objectives before choosing alerts: decide how much recent game progress the community can lose and how long the service can remain unavailable. Map dependencies such as databases, save files and authentication, then set the restoration order. Route critical alerts to a monitored channel with enough context for an administrator to identify the affected service and take the next recovery step.
What ongoing maintenance and update schedule should I follow?
Set maintenance frequency according to how often the game, mods and supporting services change, and the impact of delaying fixes. Use a staging instance for changes that affect gameplay or save formats, then schedule player-facing work during a quieter period. Keep a change log recording the reason, expected impact and rollback decision for each change. Review it during maintenance planning to identify recurring faults or risky patterns.
Disclaimer
Game titles, trademarks, logos and related assets are the property of their respective owners. Twisted Servers is an independent hosting provider and is not affiliated with or endorsed by the developers or publishers of the games mentioned unless otherwise stated. Information is provided as a general guide and may change as games, software and hosting services are updated.

