
Recommended Services


Supported Scripts


To set up a Team Fortress 2 server, configure its server software, choose the settings for your community, then test the server before inviting players. Admin commands help you manage sessions and respond to issues, but the available commands depend on the tools installed and how the server is configured.
First, decide how you’ll run the server and which settings your players need. Keep access details and configuration organised, and test changes before applying them during a live session. For administration, distinguish commands entered through the server console from tools provided by add-ons. Their syntax and permissions can differ, so use instructions that match your setup.
This guide walks through the practical stages of Team Fortress 2 server setup and administration. You’ll learn what to prepare, how to organise server settings, and how to approach common admin tasks without assuming every server uses the same tools. That gives you a clearer starting point for managing a server that suits your community.
Key Takeaways
- Use a username ban to block a specific account, and include an optional reason to make the action clearer.
- Choose an IP ban when you need to block connections from an address, keeping in mind it can affect others who share it.
- Use the matching pardon command to remove a username or IP ban when access should be restored.
- View the player and IP ban lists separately to review who or what is blocked.
- You need operator (OP) permissions to run ban and unban commands in-game.
Banning a player by Minecraft username
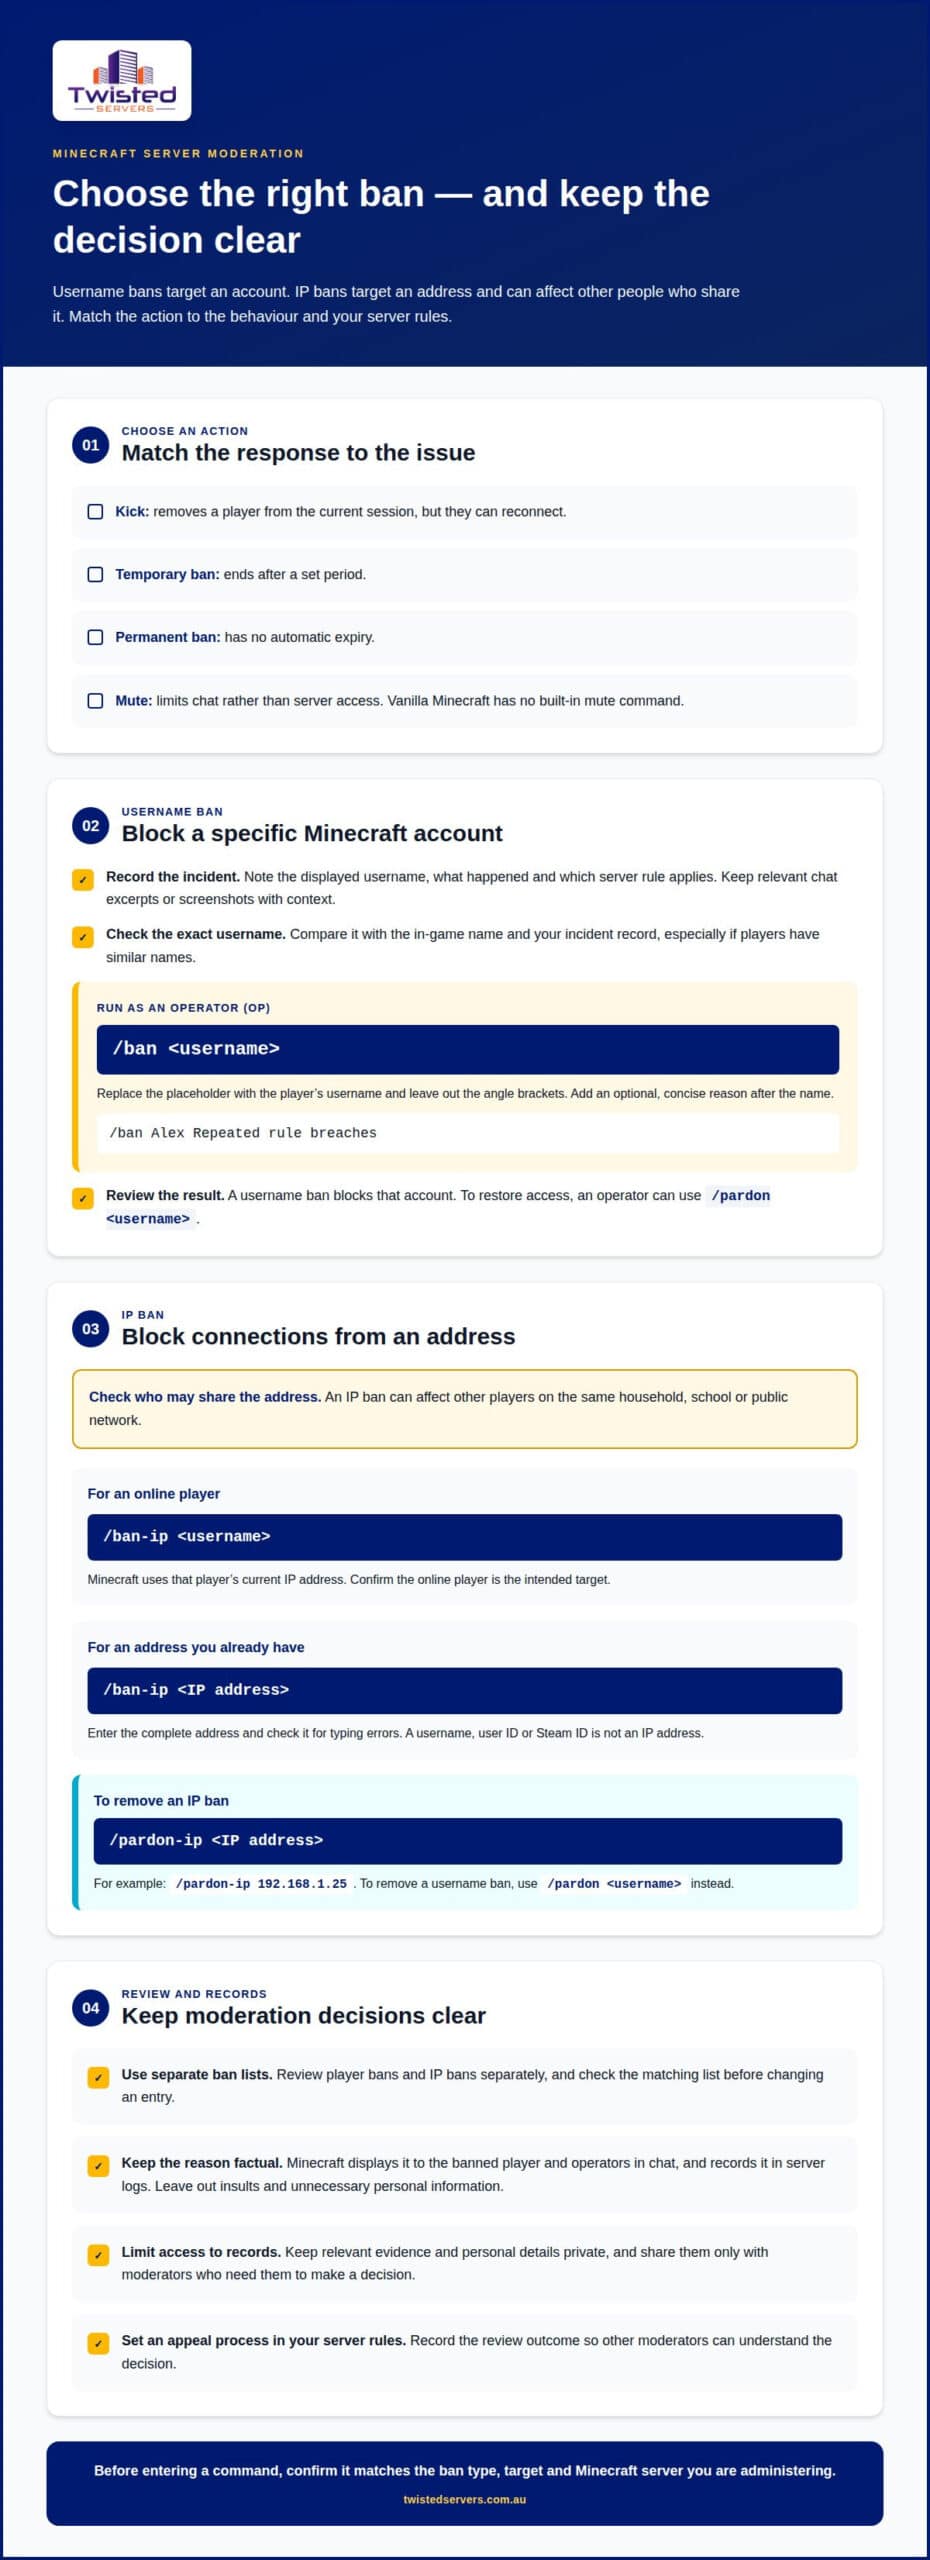
Use Minecraft’s built-in /ban command to block an account by username. You can add a reason to record the moderation decision.
-
Collect Evidence of Misconduct
Record the player’s displayed Minecraft username, the incident and the server rule involved. Save relevant chat excerpts or screenshots with enough context to understand what happened. Note when the incident occurred and which moderator reviewed it. Don’t alter evidence or publish a player’s private details. Limit records to the administrators responsible for moderation, rather than sharing them with the whole community.
-
Choose a Ban or Other Action
Match the response to the behaviour and your written server rules. A temporary ban ends after a set period; a permanent ban has no automatic expiry. A kick removes the player from the current session but allows them to reconnect. A mute limits chat rather than server access. Vanilla Minecraft has no built-in mute command, so don’t mistake a kick for a mute or ban.
- Check the username before entering a command. Compare it with the name shown in-game and in your incident record, especially if players have similar names. A Minecraft username ban targets the account you enter, not everyone using the same internet address. Don’t rely on a screenshot nickname if it differs from the player’s displayed Minecraft name.
- As an operator (OP), run
/ban <username>in-game. Replace the placeholder with the player’s username and omit the angle brackets. You can add a reason after the name, such as/ban Alex Repeated rule breaches. Keep the reason concise and factual. Minecraft displays it to the banned player and operators in chat, and records it in server logs, so avoid insults or unnecessary personal information. - Use Minecraft commands only on a Minecraft server. Rust, ARK, FiveM and Discord have different moderation systems and command syntax. A command for one service may fail or behave differently in another. Before applying a ban, confirm the instructions match the game, server software and administration tool you use.
- Handle player information carefully on an Australian community server. Keep relevant evidence, usernames and personal details private, and limit access to moderators who need them to make a decision. Don’t post identifying information as a public warning. If an incident raises a specific legal concern, seek advice based on the circumstances rather than treating a server rule as a legal ruling.
- Review the result after running the command. A username ban prevents that account from connecting, while a kick only removes the player from the current session. To reverse the decision, an operator can use
/pardon <username>. Keep your moderation record aligned with the action so another administrator can understand why access was blocked.
Banning an IP address
- Use an IP ban when you intend to block an address, rather than just one Minecraft account. It blocks connections from that address and may affect other players sharing the same network. Consider this before acting, especially when several community members connect from a household, school or public network.
- For an online player, enter
/ban-ip <username>, replacing the placeholder with their exact Minecraft username. Minecraft uses the player’s current IP address for this command. This avoids copying the address manually, but confirm the online player is the intended target before submitting it. - Use
/ban-ip <IP address>when you already have the address you intend to block. Replace the placeholder with the complete address, then check it carefully for typing errors. Don’t enter a user ID, Steam ID or Minecraft username in this form; none of these is an IP address. - Add an optional reason after the target to make the moderation record useful to other administrators. For example,
/ban-ip Alex Repeated rule breachestargets the online player and gives a concise explanation. Keep the wording factual and relevant to your server rules. Leave out personal details that aren’t needed to explain the decision. - Set an appeal process in your server rules before disputes arise. Explain how players can submit an appeal and what information helps moderators review it, such as their Minecraft username, the ban reason and relevant context. Consider the original evidence and apply consistent review standards to similar cases. Record the outcome for other moderators.
- Don’t assume an IP ban prevents every attempt to return. A player may connect through another account or network, including a VPN, and an IP address may be shared. Base moderation decisions on evidence, review new reports individually and don’t treat a changed address alone as proof of misconduct.
- Remove an IP ban with
/pardon-ip <IP address>, using the valid address rather than a player name. For example,/pardon-ip 192.168.1.25removes the ban for that address. To restore access from a username ban, use/pardon <username>instead. Choose the command that matches the original ban type. - Check the target before removing a ban. An IP pardon lifts the restriction associated with that address; it doesn’t remove a separate username ban. If a player still can’t connect after the IP entry is removed, check whether another ban remains. Keeping the original reason and review outcome in your records helps clarify the next step.
Viewing player and IP ban lists
Use Minecraft’s separate ban-list commands to review blocked accounts and addresses. Check the corresponding list before changing an entry.
-
Find the Player’s Details
Identify the player by their displayed Minecraft username before reviewing a username ban. Minecraft’s ban commands use a username or IP address, not a player user ID. For an online player whose current address needs review,
/ban-ip <username>uses their username to target that IP. Don’t substitute a user ID for either command argument. -
View Active Player Bans
Run
/banlist playersto display banned Minecraft usernames. Before pardoning an account or investigating a report, compare the listed name with the player’s exact in-game username. A similar-looking name may belong to another account, so read the full entry instead of relying on a partial match. This list shows player bans, not IP bans. -
View Active IP Bans
Run
/banlist ipsto display banned IP addresses. Match the complete address to the one relevant to your moderation action. Remember that an IP entry may affect multiple people sharing an address. Use the IP list, rather than the player list, to review an address ban. - Choose the list that matches the issue before taking action. Minecraft’s
/banlistcommand can show banned players and IP addresses; theplayersandipsarguments display the lists separately. Use/banlist playersto check a username entry and/banlist ipsto check an address entry. - Review the server’s ban files when you need to inspect stored entries directly. Minecraft stores banned player details in
banned-players.jsonand banned IP details inbanned-ips.json, both in the server’s root directory. Open the file that matches the ban type, and don’t edit entries unless you understand the effect of the change. - After confirming the correct entry, use the matching pardon command.
/pardon <username>removes a username ban;/pardon-ip <IP address>removes an IP ban. The IP list can help you identify the address for/pardon-ip. This command requires a valid IP address, not a Minecraft username. - Keep a clear moderation record alongside your review. Note the affected username or IP, the ban reason and the action taken. Minecraft can display ban reasons to operators in chat and server logs, helping administrators understand an entry. Check player and IP lists separately, since removing one ban type doesn’t remove the other.
Commands from other games should not be treated as substitutes for Minecraft’s ban-list workflow. In the Counter-Strike: Global Offensive example, the command banid 30 3 kick bans user ID 3 for 30 minutes and kicks the player from the server. Its arguments and effects belong to that example; they do not change how Minecraft’s player and IP lists work. Keep the game and command context clear when reviewing moderation instructions, and verify that a command matches the server and the type of ban under review before acting.
Operator permissions for server commands
You need operator (OP) status to run Minecraft’s in-game ban and unban commands. Confirm your permissions before entering a command.
- Confirm that your Minecraft account has OP status. Regular players can’t run in-game ban or pardon commands, even with the correct username or IP address. If a command is rejected, check the account’s operator access before changing the syntax or target.
- If you don’t have OP status, ask the current server administrator to grant it to your account through the server’s existing administration process. Provide your exact Minecraft username. Don’t use another player’s account or ask them to share login details; an authorised operator should run the command.
- Once you’ve confirmed OP access, run the command for the task. Use
/ban <username>for a username ban and/ban-ip <username or IP address>for an IP ban. Replace the placeholder with the actual target and omit the angle brackets. - Use the corresponding pardon command to restore access. Enter
/pardon <username>to remove a username ban, or/pardon-ip <IP address>to remove an IP ban. The IP command requires a valid address, not a Minecraft username, so check the target before submitting it. - Check ban records with
/banlist playersor/banlist ips. The first displays banned usernames; the second displays banned IP addresses. Match the target to the correct list before deciding which pardon command applies. A username entry and an IP entry are different ban types. - Limit operator access to people who need to administer the Minecraft server. OP status allows users to run in-game ban and unban commands, so an account with that status can affect who connects. Agree on who handles moderation and how operators record decisions, especially when several administrators share responsibility.
- Separate permission issues from target or syntax mistakes. If
/banlist playersfails, first confirm the account has OP status, then enter the command exactly. If the list works but a ban command doesn’t, check that the username or IP address is correct and that you selected the matching command. - Keep a short operator procedure alongside your server rules. Record which operator reviewed the incident, which Minecraft command they used and whether the target was a username or IP address. This helps another administrator distinguish a permission issue from an incorrect ban target when reviewing the action.
How do I find a player’s username, user ID, or IP address for a ban?
- If you’re preparing a username ban, start with the player’s displayed Minecraft username. Record the full name as it appears in-game, then compare it with the player entry in
/banlist players. Minecraft’s/bancommand takes a username, not a user ID. Don’t substitute a number from another game’s console. - Use the correct target for the ban type you intend to apply. A Minecraft username identifies the account for
/ban; an IP address identifies a network connection for/ban-ip. These targets aren’t interchangeable. An IP ban may affect other players using the same address, so choose it carefully. - Use
/ban-ip <username>when the player is online and you want to ban their current IP. Replace the placeholder with the exact Minecraft username. This avoids copying the address manually. Add an optional reason after the target if you want to explain the action in chat and server records. - Use
/ban-ip <IP address>when you already have the correct address. Enter the complete address, not a username or user ID. Check each part before submitting the command; a mistyped address may target the wrong connection or fail to apply the intended ban. - Don’t treat a user ID as a Minecraft ban identifier. Some games show player details through a
statuscommand, including a user ID and Steam ID. In that output, the first number on a player’s status line is their user ID. Those identifiers belong to that game’s administration process, not Minecraft’s username-based ban command. - If you’re reviewing an earlier IP ban, check the server’s existing records. Run
/banlist ipsto display banned addresses, then compare the complete address with your moderation notes. For username entries, use/banlist players. Minecraft stores these records separately, so neither list shows both target types. - Keep the source and purpose of each identifier clear in your moderation notes. Label a name as a Minecraft username, an address as an IP, and a number as a user ID only when the game’s output identifies it that way. Don’t paste a Steam ID into
/ban-ip, which expects an IP address or an online player’s username. - If you discover that the wrong target was banned, use the matching pardon command. Enter
/pardon <username>for a player ban, or/pardon-ip <IP address>for an IP ban. The IP command requires a valid address. Review the corresponding ban list first, then enter the identifier shown there.
Twisted Servers
Twisted Servers offers Game Server Hosting for communities that want a hosted environment for multiplayer sessions. If you’re managing bans alongside server setup and ongoing administration, hosting can bring the game server infrastructure together in one place. Choose the moderation commands that match your game, since Minecraft commands aren’t interchangeable with Team Fortress 2 tools.
Twisted Servers offers VPS Hosting and Dedicated Server Hosting for teams that need more control over their server environment. The right option depends on how you plan to manage the server and its requirements. Whatever your setup, clear rules, careful ban records and limited operator access remain important.
If you’d like to discuss your game server hosting needs, contact Twisted Servers.
Build a fair moderation process for your server
A clear moderation policy helps you handle future incidents consistently. Set out the behaviour your community expects, explain how moderators make decisions and provide a way for players to appeal. This gives operators a shared reference when disputes arise, rather than leaving each decision to individual judgement.
To decide how to ban a player from my server consistently, connect each moderation action to your rules and the available evidence. Keep the process understandable for players and practical for the people administering your community. Review it as your server grows or its needs change.
Twisted Servers offers Game Server Hosting, VPS Hosting and Dedicated Server Hosting for different server management needs. If hosting assistance would help you focus on your community, contact Twisted Servers. Choose an approach that suits your plans, and keep building a welcoming, well-managed place to play.
Frequently Asked Questions
How do I ban a player from my server?
For a Minecraft server, an operator can enter /ban <username> to block a named account. Add a brief, factual reason if useful for moderation records. Team Fortress 2 uses different administration tools, so don’t assume Minecraft syntax works there. Check the commands supported by your server software before acting, and match the ban target to the player you intend to restrict.
How do I ban and unban a player using server commands or the admin panel?
For Minecraft, use /ban <username> to ban an account and /pardon <username> to remove that ban. For an address, use /ban-ip and /pardon-ip with the appropriate target. An admin panel’s labels and actions depend on its software, so choose the player or IP option that matches the intended ban. Team Fortress 2 commands are game-specific.
How do I configure ban permissions and prevent moderators from abusing them?
In Minecraft, only operators can run ban and unban commands in-game. Give OP status only to trusted administrators, and set written moderation rules describing when a ban is appropriate. Keep a record of the reason and decision, and have another administrator review disputed or serious cases. For Team Fortress 2, permission settings depend on the server’s installed administration tools, so apply the same least-access approach there.
Disclaimer
Game titles, trademarks, logos and related assets are the property of their respective owners. Twisted Servers is an independent hosting provider and is not affiliated with or endorsed by the developers or publishers of the games mentioned unless otherwise stated. Information is provided as a general guide and may change as games, software and hosting services are updated.

