
Recommended Services


Supported Scripts

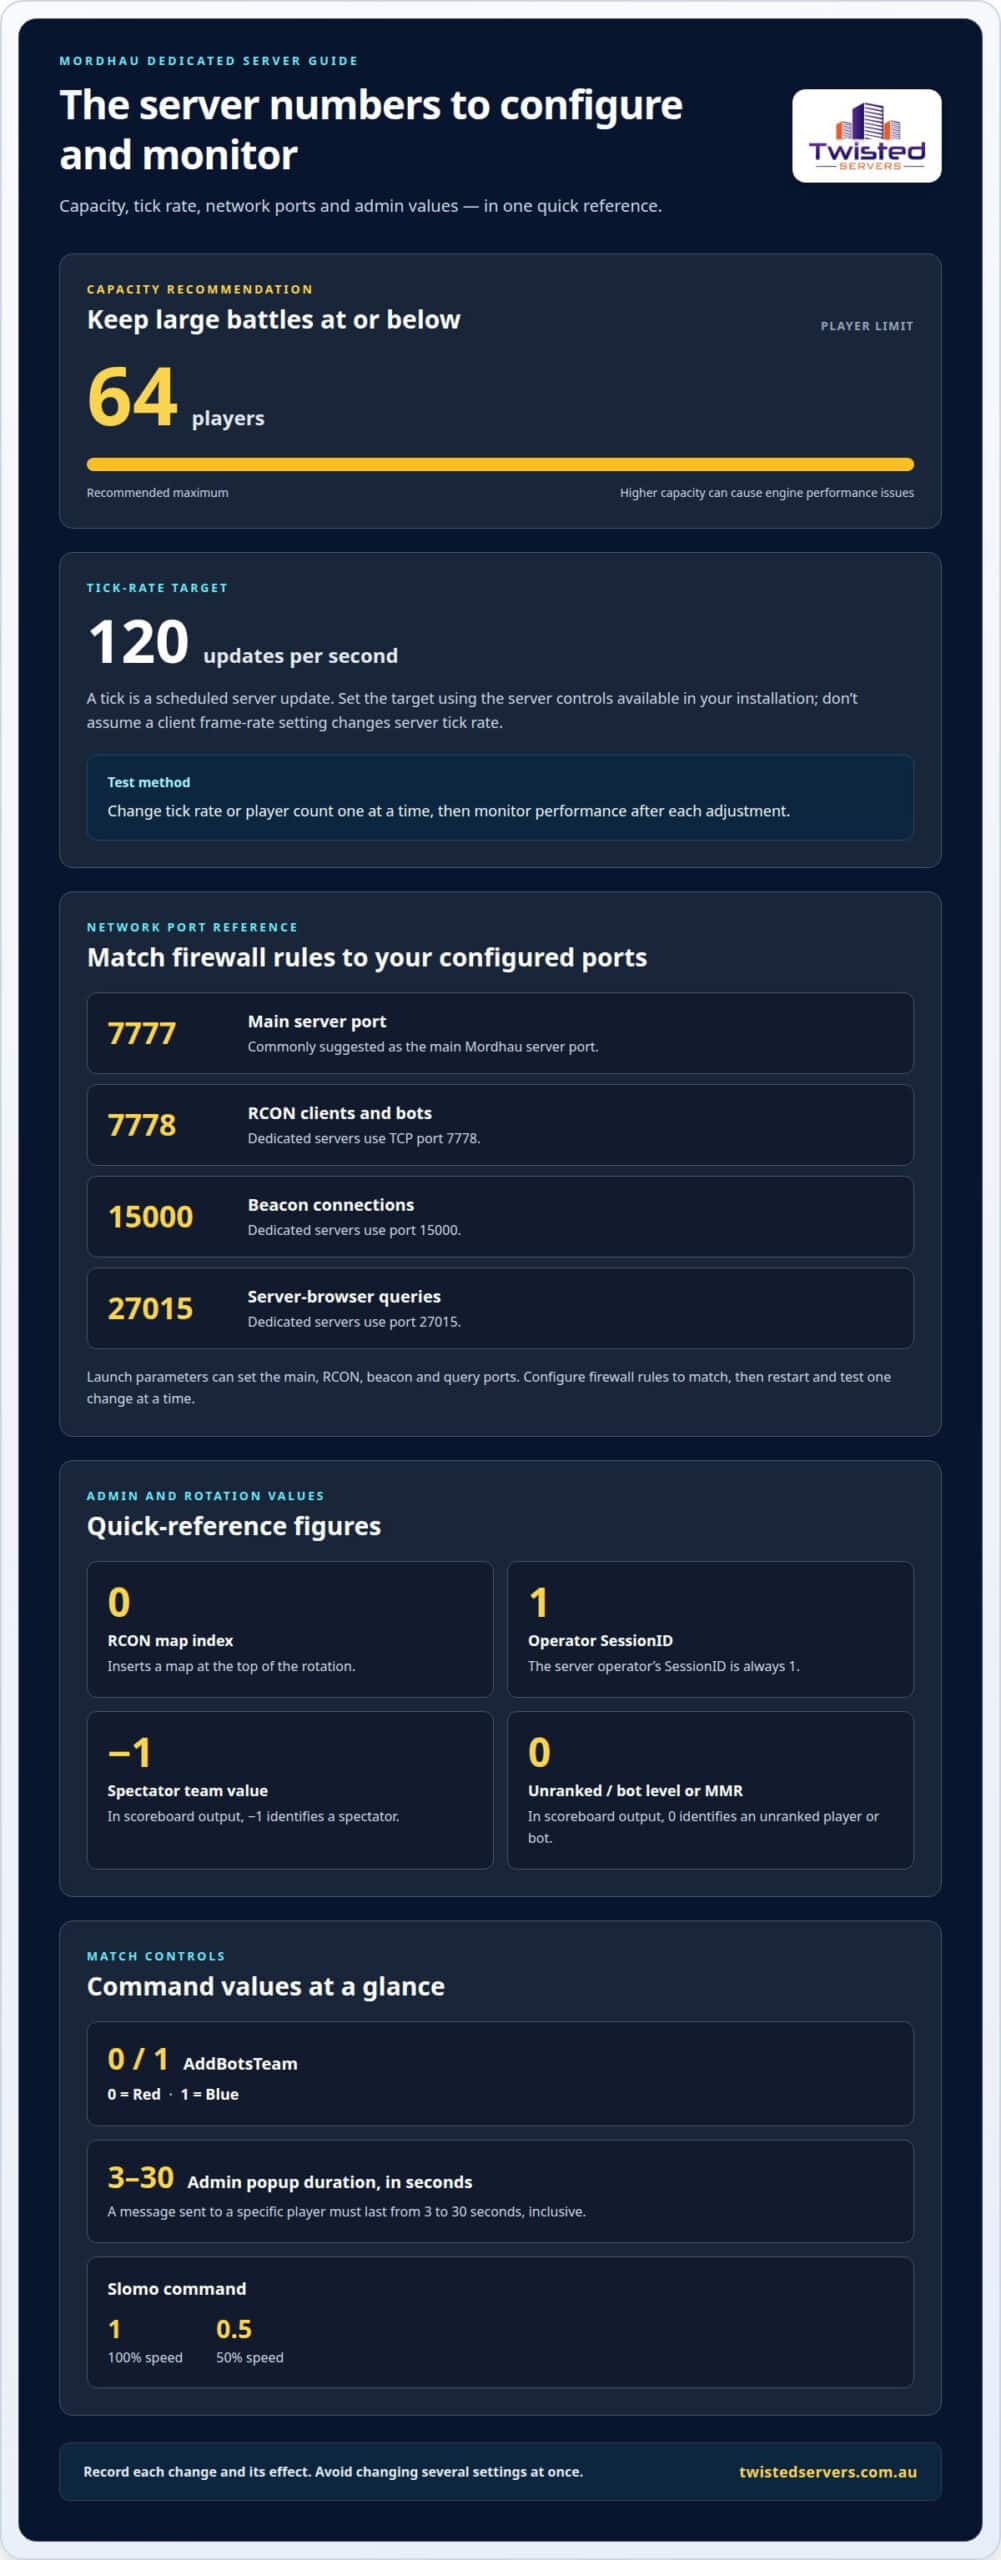
What if the choice between renting and self-hosting matters as much as your Mordhau server configuration? You can rent game server hosting or run a dedicated server yourself; for large battles, the Mordhau server configuration guide advises staying at or below 64 players, as higher capacity can cause engine performance issues.
Player slots are only part of server capacity. Tick rate can also affect performance, so adjust settings one at a time and monitor the result to see what each change does.
This guide covers getting a Mordhau server, comparing rented hosting with self-hosting in Australia, and configuring player capacity, tick rate, Game.ini settings and control-panel tools. It also explains why you should edit configuration files while the server is stopped and how to test changes methodically.
Key Takeaways
- Choose between renting and self-hosting based on how much server setup and upkeep you want to manage.
- Keep capacity at or below 64 players; higher counts can cause engine performance issues.
- Change tick rate and player count one at a time, monitoring server performance after each adjustment.
- Build map rotations with level names rather than file paths, and use RCON’s index 0 to place a map at the top.
- Shut down the server before editing configuration files, so changes aren’t overwritten when it stops.
How to get a Mordhau server ?
To configure a Mordhau dedicated server, first get access to the server and set its basic details. Then configure game modes, map rotation and network ports. Apply changes carefully, restart the server when needed, and test access before inviting players.
Use these steps to organise your setup. Record each setting so you can trace any problems that follow a change.
-
Set the server name, password, map and game mode
Open the server’s configuration options or control panel and enter a recognisable server name. Add a password if you want to restrict access, and share it only with intended players. Choose a starting map and an available game mode in the server settings. Save your changes before starting or restarting the server.
Check each entry for spelling and formatting errors. An incorrect map name or unsupported game-mode value can stop the intended match from loading. Before editing, note the previous settings so you can restore them if the server fails to start. A password controls access, but does not replace correct network settings.
-
Configure game modes and map rotation
Choose a game mode that suits your community, then build a rotation of maps compatible with it. Mordhau community map rotation entries in
Game.iniuse level names without paths. Enter the level name itself, not a directory path.Add each map as a separate rotation entry, then check the order before restarting. If you use RCON, the
addmapcommand can insert a map at array index0, placing it at the top of the rotation. Test the rotation in sequence, rather than changing several entries at once. If a map fails to load, review its level name and the active game mode before changing unrelated settings. -
Check server ports and firewall requirements
Allow the ports needed for players, server-browser queries, RCON and beacon connections through the host firewall and network firewall. Mordhau’s main server port is commonly suggested as
7777; dedicated servers use TCP port7778for RCON clients and bots, port15000for beacon connections, and port27015for browser queries.Launch parameters can set the main, RCON, beacon and query ports with
-Port=XXXX,-RconPort=XXXXX,-BeaconPort=XXXXXand-QueryPort=XXXXX. Set firewall rules to match the ports configured on your server. If players can’t connect, first check the server status, port values and firewall rules. If the server appears in the browser but connections fail, also inspect the gameplay and beacon paths. Change one setting at a time, then restart and test again.
Player capacity for large battles
Set a player limit of 64 or fewer for large battles; going above 64 players generally causes engine performance issues and is not recommended. Configure admin access through the server’s supported admin settings, then use available commands carefully to manage matches and communicate with players.
-
Set player slot limits
Set the server’s player limit to 64 or fewer, then save the setting before testing a match. A higher slot count can increase the work the game engine must handle, so a larger number of advertised slots doesn’t guarantee a better battle. Keep the configured limit aligned with the capacity you can operate reliably.
Adjust the player limit gradually rather than exceeding the recommended threshold. Monitor performance during a match and watch for slow responses or instability. Player demand can vary between rounds, so base adjustments on actual server behaviour, not just the planned event size.
-
Manage performance for large battles
Increase player count and tick rate one at a time, then monitor performance after each change. This makes it easier to identify which setting affects the server. If you change both together, a slowdown gives you less information about its cause. Keep the player limit at or below 64 while assessing adjustments.
Memory use and engine load can rise as more players join and interact. Monitor the server during active combat, not just when it’s empty. If performance worsens after an increase, reverse that change before testing another setting. A stable lower limit is preferable to a higher one that disrupts battles.
- Use admin commands deliberately, and distinguish them from player chat. The server operator’s SessionID is always
1. In scoreboard output, team value-1identifies a spectator, while level/MMR value0identifies an unranked player or bot. These values help admins interpret status information; they are not player-slot settings.For team bot management, the
AddBotsTeamcommand uses team0for Red and team1for Blue. Check the target team before issuing the command, so bots join the intended side. Use admin popup messages for concise match information; each message sent to a specific player must last from 3 to 30 seconds, inclusive.Use the
Slomocommand only when a match change is intended:1represents 100% speed, while0.5represents 50% speed. Keep a record of command changes, their effect on the match, and the player limit in use. That record helps admins trace performance changes without altering several settings at once.
Configuring a 120 tick server
A tick is a scheduled server update, so 120 tick describes a target of 120 updates each second. Use the server controls available in your installation to set that target, without assuming a console command or configuration key.
-
Set online and LAN tick rates
Review the tick-rate controls available in your dedicated server setup and identify which applies to the server you’re configuring. Don’t assume online and LAN sessions use the same setting, or that a client-side frame-rate option changes server tick rate. Use the control labelled for the server’s update rate.
If the interface shows separate online and LAN values, record each one and what it controls. Don’t copy a value from a client graphics menu into a server field. These controls affect different parts of the game, and changing the wrong one won’t set the dedicated server’s update target.
-
Configure server tick rates
Use the server’s exposed setting to enter 120 as the intended tick-rate target. Save it through the interface or configuration method provided by your installation. Don’t invent a console command, launch parameter or
.inikey; an unsupported entry may be ignored or cause configuration trouble.Keep the value and its location in your setup notes. That makes it easier to recognise the intended setting if you later review the server files or panel. A 120 tick target describes the requested update frequency, not a promise that every update will be completed on schedule.
- Distinguish server tick rate from client frame rate when explaining the setting to players. Tick rate concerns how often the server updates; frame rate concerns how often a player’s device displays frames. Changing graphics settings on a player’s device doesn’t change the dedicated server’s tick target.
Make that distinction clear in your community’s setup notes or Discord announcement. Players’ client settings and connection conditions can also affect how smooth the game looks. A displayed client frame rate doesn’t confirm the server’s tick setting.
Use the control for the server installation, and save the original value before editing. If the interface doesn’t offer a tick-rate option, don’t substitute a guessed command or file entry. The configuration method must match the controls available for that dedicated server.
Game.ini configuration and control panel tools
Locate the server’s configuration files before changing settings. Mordhau uses different files for different settings, so edit the right file and restart the server afterward.
-
Find Game.ini and Engine.ini
Use the server’s file-access tools to locate
Game.iniandEngine.ini. Their folder can depend on the installation, so use the configured file location rather than guessing a path. Stop the server before editing either file.Stopping the server first matters because Mordhau can overwrite edited files with the version held in memory when it shuts down. Stop the server, save a copy of each original file, then make and save your changes. Restart only after the edited files are in place.
-
Set general game settings
Set the default map in
Engine.iniwith theServerDefaultMapsetting and the level’s complete path. Unlike community map rotation entries, this setting needs the full path. Confirm the path identifies the intended level, then save the file while the server is stopped.Keep each setting in its correct file rather than moving entries between
Engine.iniandGame.ini. After restarting, confirm that the server loads the intended default map. If it doesn’t, stop the server and review the setting and full level path before changing other options. -
Configure game-mode settings and overrides
Edit game-mode settings in
Game.ini, keeping each value with the relevant mode configuration. Mordhau game-mode duration settings use seconds. Enter durations in seconds, not minutes or clock format, and check the edited entry before restarting.Follow the configuration structure expected by the server. Don’t add guessed keys or change unrelated mode settings. If an override behaves unexpectedly, stop the server and review the affected entry. Change one setting at a time to identify which value caused the difference.
-
Use control panel tools and mod support
Use the control panel or file tools available to access the server configuration and stop or start the server. The panel helps you manage the installation, but doesn’t change which Mordhau file a setting belongs in. Make sure
Game.iniandEngine.iniedits apply only to their intended settings.To install community mods, add each mod ID to
Game.ini, then restart the server for the changes to take effect. Add IDs as separate entries and keep a record of them. If a mod doesn’t load, check its ID and whether you restarted before changing other settings. - The Mordhau server configuration guide recommends reducing log growth by changing several default logging levels from
VerbosetoLog. Make these edits while the server is stopped, then restart and review the resulting logs. Keep a copy of the original settings in case you need to restore them.
Renting or self-hosting a Mordhau server
Choose hosting based on who will manage the machine, network and updates. With rented game server hosting, a hosting service operates the underlying server. With self-hosting, you manage the installation, connectivity and ongoing maintenance.
- Choose a rented server if you’d rather focus on settings, matches and community management than maintaining a host PC. Check that you’ll have the access needed for your configuration, including file editing and server restarts. Make sure the available controls suit your planned map rotation and community maps before building your setup around them.
Server location can affect latency for an Australian community. Australian players may get lower latency from an Australian server than from one overseas, though results depend on each player’s location, ISP, routing and the server’s location. Let your Discord community know where the server is hosted so players understand which region they’re joining.
- Self-hosting suits people prepared to operate the dedicated server and manage its network access. You’ll need to install the server software, maintain its files, apply updates and configure the firewall or router. You get direct control of the host, but are also responsible for diagnosing problems with the PC, network and server process.
Plan updates around your community’s sessions. Mordhau server owners need to restart the server to receive updates to installed mods, so schedule the restart and notify players through Discord. Keep the server configuration and mod IDs backed up separately so you can restore your setup after a change.
- Check operating system compatibility before setting up a self-hosted server with community maps. Windows is recommended for Mordhau servers hosting community maps, because some maps cooked for Windows can have collision issues on Linux. If community maps are central to your rotation, this may make Windows the more suitable choice.
Also account for network setup. One suggested forwarding setup includes TCP ports
27015-27030and27036-27037, plus UDP ports4380,7777-7778,27000-27031and27036. Match firewall and router rules to the server’s configured ports; don’t treat a port list as a substitute for checking the server’s launch settings. - Test access from outside your local network before announcing a self-hosted server. Players in your household can connect locally; players elsewhere need the host’s public IP address. Forward the required ports to the hosting PC’s local IP, and reserve that address in the router for the PC’s MAC address so the forwarding target stays consistent.
Avoid placing the hosting PC in a router DMZ if it isn’t otherwise secured. If you’d rather have a managed hosting environment than maintain a home PC and router rules, explore game server hosting options for your community.
Twisted Servers
Twisted Servers offers Game Server Hosting for communities that want to run multiplayer servers without maintaining a home PC and router. When comparing rented hosting with self-hosting, consider how much control, configuration access and ongoing upkeep your community needs. VPS Hosting and Dedicated Hosting are also available for projects that need more control over the server environment. The right fit depends on your setup and management preferences.
Keep the game’s configuration separate from the hosting choice: map rotations, player limits and server settings still need to suit your community. If you’d like to discuss your server plans and suitable hosting options, contact Twisted Servers.
Plan your next server step
Running a large-battle server takes ongoing attention, not just an initial set of settings. As your community grows, its preferred maps, match formats and moderation needs may change. Keep a clear record of your decisions and adjust the setup to better suit how your players want to play.
Good Mordhau server configuration also means choosing a hosting arrangement that suits your time and technical needs. Twisted Servers offers Game Server Hosting, VPS Hosting and Dedicated Hosting, giving you different options for your gaming setup. The right choice depends on how much server access and maintenance you want to manage.
If you’re ready to discuss a hosting option that suits your plans, contact Twisted Servers about hosting. Your community can take its next step with a setup planned around the way you want to play.
Frequently Asked Questions
How do I add a community map to the rotation?
Add the map to the rotation after its files are installed, and check that the entry matches the map’s level identifier. For an event, save a separate copy of the intended rotation before making changes. This gives admins a reference during setup and helps distinguish an incorrect rotation entry from a map installation issue.
How do I host community maps on my server?
Store map files in the server installation, not just on an administrator’s computer. Keep the files and map identifiers organised together, then prepare a small test rotation before using the maps in a public session. This makes it easier to identify a map that causes loading problems. For a community event, share the planned map order in your Discord announcements.
How do I restrict certain weapons and equipment?
Apply restrictions only through a setting or mod that specifically supports the item limits you need. Don’t assume Mordhau configuration includes a particular weapon-restriction key or add one based on guesswork. Set out the permitted equipment in your server rules, then use a supported option and test it before announcing the rules.
How do I set the default map?
Choose the initial level using the server’s default-map control, and confirm that the level is present in the server installation. If the server starts on an unexpected map, compare the active startup settings with your selection. Check that the game mode suits the level, then resolve any conflict before opening the server to players.
How do I set my server to 120 tick?
Set the server-side tick-rate control to 120 if that option is available in your server setup. Tick rate is separate from a player’s graphics frame rate, so changing a client display setting won’t set the server’s update target. Record where you entered the value and keep the previous setting available, making it easier to restore if the new configuration causes problems.
What are the Mordhau server configuration file locations and settings?
Find the configuration files in the dedicated server installation, using the file access provided for that host. Don’t confuse server settings with files in a player’s local Mordhau installation: changing a client file won’t configure the dedicated server. Back up the original server files before editing, and record each change to make later maintenance easier to trace.
How do I install and run a Mordhau dedicated server on Windows or Linux?
Install the dedicated-server software on the operating system you intend to use, then follow that installation’s launch method and server settings. Keep server files separate from game client files, and confirm the dedicated-server process starts before sharing connection details. On a Linux host with community maps, account for possible collision issues with maps cooked for Windows when choosing your setup.
How do I configure Mordhau server rotation, map voting and gameplay rules?
Set the rotation to match the event schedule, then document the intended sequence for moderators. Map voting differs from cycling through a fixed rotation, so use voting only if your server setup provides a supported option. State gameplay rules clearly in your community guidelines and make sure moderators apply them consistently during matches.
Disclaimer
Game titles, trademarks, logos and related assets are the property of their respective owners. Twisted Servers is an independent hosting provider and is not affiliated with or endorsed by the developers or publishers of the games mentioned unless otherwise stated. Information is provided as a general guide and may change as games, software and hosting services are updated.

