
Recommended Services


Supported Scripts

More slots do not automatically make a better server. A practical Garry’s Mod server configuration matches player capacity and game mode to available resources. Sandbox, DarkRP and other modes can place different demands on a server. There is no single slot count or RAM allocation that suits every community: player numbers, maps, add-ons and server load all matter.
Choosing settings can feel like guesswork, especially when you want to avoid lag without paying for resources you will not use. This guide shows you how to assess expected player numbers and workload, then adjust settings as your server develops.
You will also learn how to select and configure popular game modes, secure RCON access, set Sandbox prop and entity limits, and organise admin tools. The steps cover relevant server files and settings, with Australian players and hosting conditions in mind, so you can build a server around the way your community plays.
Key Takeaways
- Match player slots and RAM to your community’s expected activity, game mode and add-ons rather than choosing by slots alone.
- Use the control panel and server configuration files to apply settings in an organised way.
- Choose a game mode that suits your players, then tailor its settings to shape the experience.
- Protect remote administration by setting a strong RCON password and managing access carefully.
- Set Sandbox limits and admin tools to keep building manageable and moderation clear.
How Many Slots & How Much RAM Does My Garry’s Mod Server Need?
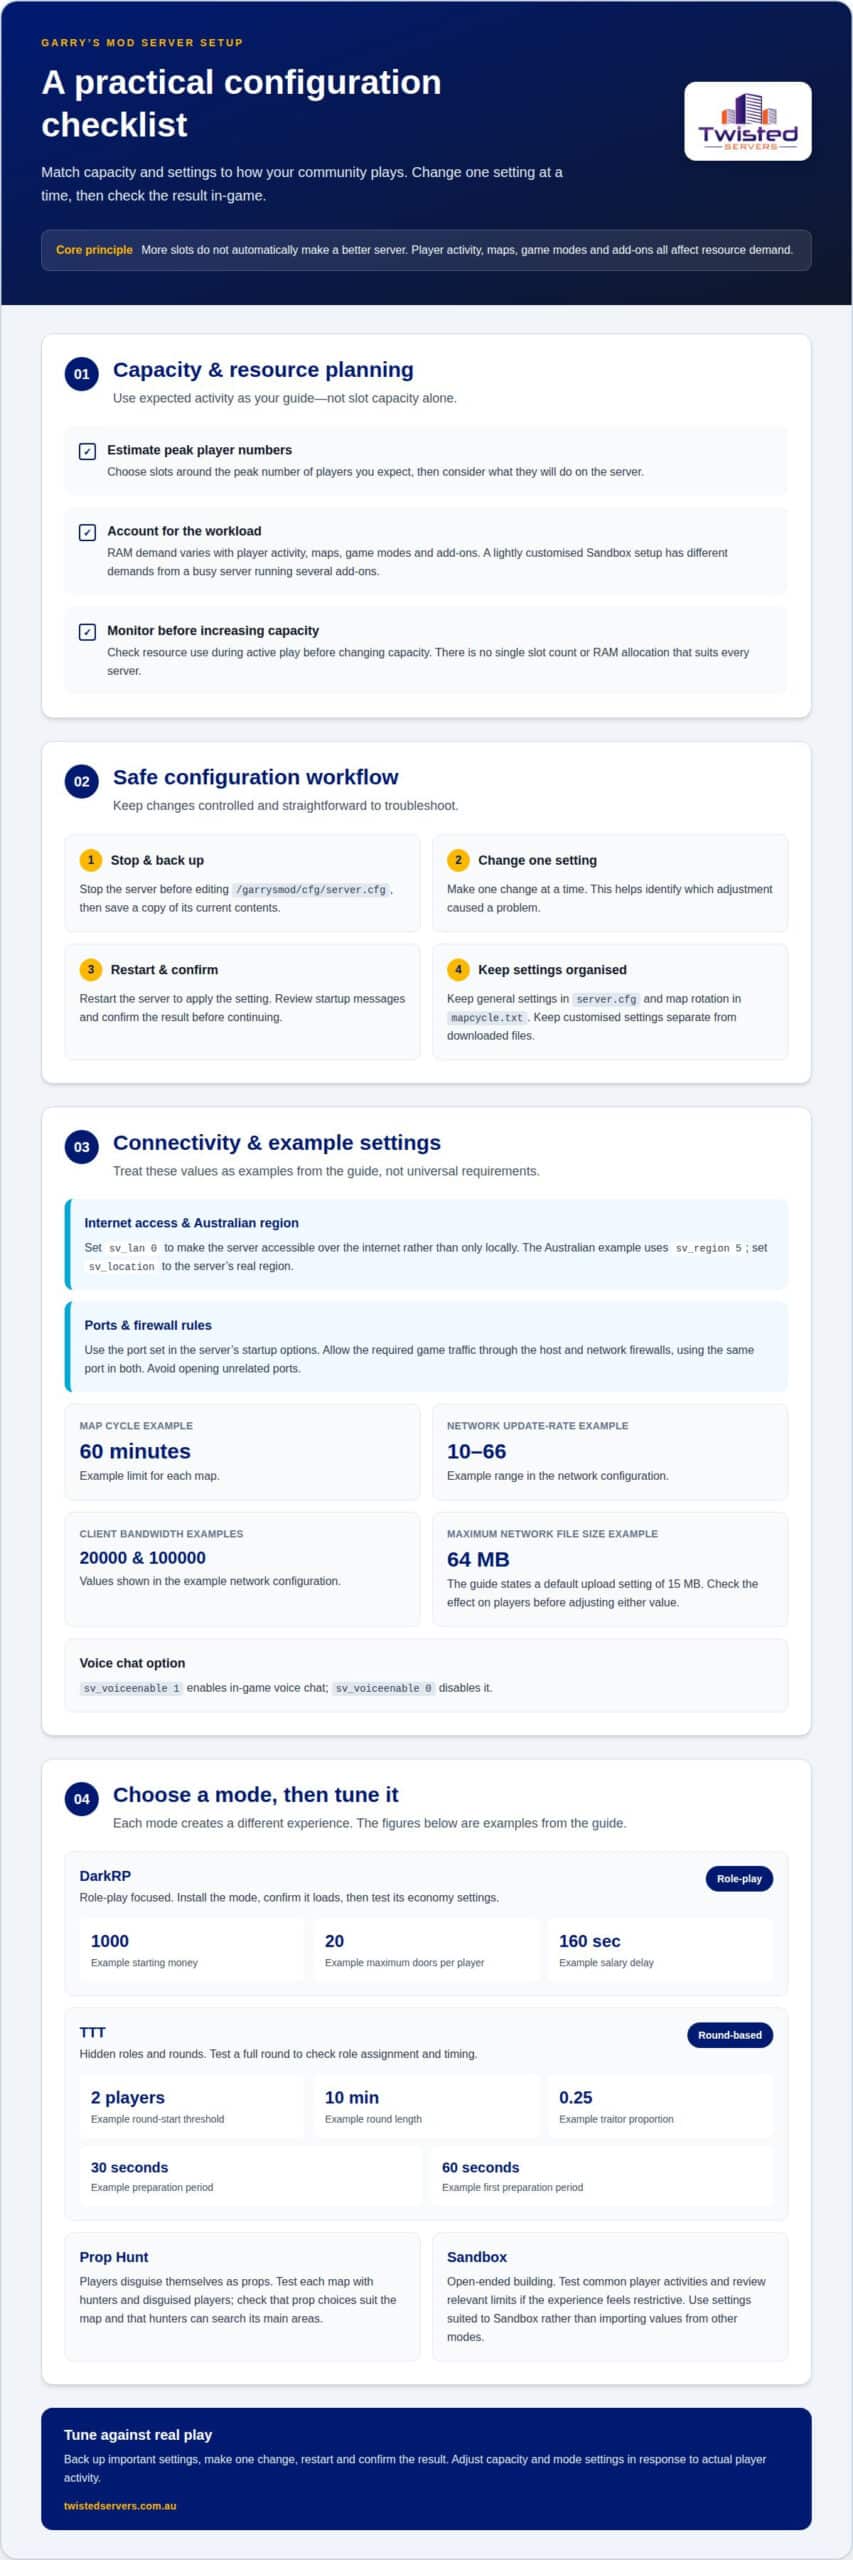
- Choose slots based on the peak number of players you expect, then consider what they will do. RAM demand varies with player activity, maps, game modes and add-ons, so no single allocation fits every server. A lightly customised Sandbox setup has different demands from a busy server running several add-ons. Monitor resource use during active play before changing capacity.
- Open the main settings file at
/garrysmod/cfg/server.cfg. Stop the server before editing it, then save a copy of its current contents. Change one setting at a time and restart the server to apply it. This makes it easier to identify which adjustment caused a problem. - Configure a dedicated server by editing its settings file and startup options, then restarting it. Set
sv_lan 0to make the server accessible over the internet rather than only locally. For an Australian server, the example usessv_region 5; setsv_locationto the server’s real region. - Use SteamCMD to install or update the Garry’s Mod dedicated server files. Select the dedicated server package, choose its installation directory, and run the install or update process. Then launch the server and review its console output. Keep customised settings separate from downloaded files to make updates easier to manage.
- For ports and firewall rules, use the port configured in your server’s startup options. Allow the required game traffic through the host firewall and any network firewall, using the same port in both. Avoid opening unrelated ports. If players cannot connect, compare the startup setting with the firewall rule and connection details.
- Keep general settings in
server.cfgand map rotation inmapcycle.txt. The example map cycle uses a 60-minute limit for each map. An example network configuration uses an update-rate range of 10 to 66, with client bandwidth values of 20000 and 100000. Treat these as example settings, not universal requirements. - Choose voice and file-transfer options to match how players use the server. Set
sv_voiceenable 1to enable in-game voice chat or0to disable it. The example sets the maximum network file size to 64 MB, while the stated default upload setting is 15 MB. Check the effect on your players before adjusting either value. - Back up important settings before making changes, and use the server console to review startup messages. To guard against configuration mistakes, make one change, restart, and confirm the result before continuing. A measured Garry’s Mod server configuration connects resource choices to actual player activity instead of relying on slot capacity alone.
DarkRP, TTT, Prop Hunt and Sandbox
- Choose a game mode based on the experience you want to create. DarkRP focuses on role-play, TTT uses hidden roles and rounds, Prop Hunt centres on players disguising themselves as props, and Sandbox allows open-ended building. Set one mode as the server’s active choice, then check its settings separately from general server options.
- Install DarkRP by uploading its unzipped folder through FTP to
/garrysmod/gamemodes. Use the server’s documented method to set DarkRP as the active game mode, then save the selection and restart the server. Confirm that the mode loads before changing its economy settings. If it does not, check the folder location and selected mode. - Set DarkRP’s starting economy to suit the pace of your role-play. The example configuration gives new players 1000 in starting money and allows each player to own a maximum of 20 doors. These settings affect how quickly players can establish themselves and claim property, so test them during a normal session.
- Adjust DarkRP salary timing to support the same pace. The example sets the delay between salary payments to 160 seconds. Consider how that interval works with starting money and player activities. Change one economy value at a time, then observe how players earn and spend before making further adjustments.
- Set TTT’s player threshold and round length in its gamemode settings. The example starts rounds with 2 players and gives each round 10 minutes. These values shape how quickly players enter a match and how long they have to identify roles. Test both settings in a complete round.
- Configure TTT’s role selection and preparation periods as a related group. The example uses a traitor proportion of 0.25, a 30-second preparation period, and a 60-second first preparation period. Start a test round and confirm players receive roles and preparation time as intended before opening the server to your community.
- For Prop Hunt, test each selected map with both hunters and disguised players. Check that the prop choices suit the map and that hunters can search its main areas. A map that makes disguises difficult to distinguish can affect round balance, so assess maps in play before adding them to the rotation.
- For Sandbox, choose settings that suit the building experience rather than importing DarkRP or TTT values. Test common player activities, then review relevant limits and mode settings if the experience feels restrictive. After changing a setting, restart the server and confirm Sandbox loads as intended.
Check the server’s DarkRP installation guidance for the correct folder and the documented method for selecting the mode. Complete these installation steps before changing economy options. Compare the folder destination and mode selection with the guidance, and correct either step if needed. Once both match, continue with the economy tests described earlier, changing relevant settings and checking the results in play. This separates installation checks from tuning the role-play experience.
RCON password and authentication settings
- Set a strong RCON password in
server.cfgbefore using remote commands. RCON provides access to server administration, so keep its password private and separate from player-facing information. Do not include it in screenshots, public posts or configuration files shared for download. If the password is exposed, replace it and update authorised access details. - Review authentication activity when investigating unexpected RCON behaviour. Failed RCON authentication attempts can be a useful signal when reviewing unexpected access behaviour. Repeated failures warrant checking how the password is stored and who can access it. Treat the password as an administrative credential, not as a general server setting to share with moderators or players.
- Keep the server’s startup choices aligned with the mode and map you intend to run. Select the game mode, starting map and player limit in the relevant startup or server settings, then inspect the console after launch. When changing modes, review the active options rather than relying on a remembered command line, so the server starts as intended.
- Use
server.cfgfor general settings, and keep game-mode-specific options with their corresponding mode. This separation helps prevent unrelated settings from carrying over when you change modes. Save a copy before editing, change one value at a time, and restart to apply it. Check the console to confirm the server has loaded as intended. - Choose PvP, god mode and noclip rules to suit the server’s intended play style. These settings affect player interaction and movement, so align them with the active game mode and its permissions. For example, a building-focused setup may need different movement rules from competitive play. Test with a regular player account, not only an administrator account.
- Keep TTT round and role options in TTT’s own settings. Review the player threshold, round duration, role selection and preparation periods together, because each shapes the flow of a match. Start a test round after making changes and confirm players receive roles and preparation time as intended. Avoid changing several round values before testing.
- Follow your server’s instructions for adding maps, then check that they are available before use. Check the server’s Workshop and map setup separately to confirm the content is available as intended. A Steam Web API Key for Workshop setup can be generated through the Steam Community developer page.
- Limit admin permissions to the commands each role needs, and back up
server.cfg, game-mode settings and ban files before editing. Keep RCON credentials out of shared copies. This reduces exposure if a configuration file is distributed and gives you a way to restore settings after an unwanted change.
Sandbox prop and entity limits
- Set the Sandbox prop limit to suit the builds players create. The example configuration allows 200 props per player. This gives each player room to construct while limiting uncontrolled prop growth. If large builds strain physics or clutter maps, reduce the limit and test the change during a typical session.
- Configure related entity caps as a group, not in isolation. The example sets each player’s maximum to 6 ragdolls, 3 lamps and 20 wheels. It also allows 15 balloons, 1 effect and 2 dynamite items per player. These limits shape what players can build and how many active entities accumulate.
- Review vehicle and construction tools separately. The example permits 10 vehicles, 30 thrusters, 10 hoverballs and 15 buttons per player. These objects can form complex physics contraptions, so consider how they interact with your maps and play style. Apply a single cap change, then observe its effect before adjusting another.
- Decide whether players need NPC spawning in your Sandbox server. The example sets the maximum number of NPCs each player can have to 0. That prevents player-spawned NPCs under that limit setting. If NPC use is part of your community’s builds, choose a suitable cap and test it with the other entity limits.
- Set the player limit to match your intended concurrent audience and available server resources. A higher slot count allows more connections, but does not determine how many physics objects players can create. Treat player slots and per-player entity caps as separate controls, then test busy sessions for crowded builds and sluggish physics.
- Track performance during real Sandbox play, not just on an empty server. Ask players to test typical builds, vehicles and tool use. If physics updates become delayed, inspect entity counts and map load before changing several limits. Reduce the setting most closely connected to the problem, then repeat the same test.
- Keep a record of each limit and its previous value. Before editing configuration files, save a backup so you can restore working settings if a change causes problems. Record the map, player activity and entity type involved. These details help distinguish a single oversized build from a broader server performance issue.
- Factor slots and resource needs into hosting costs without assuming that a particular slot count sets the price. Choose limits based on actual Sandbox play, then check the available hosting options and pricing with Twisted Servers.
Admins, ULX, RCON and console tools
- Choose one admin system before assigning permissions. ULX is a common Garry’s Mod administration add-on, while RCON provides remote console access. The tools serve different roles: an admin add-on manages in-game moderation, while RCON sends commands from outside the game. Avoid granting the same broad access through both without a clear need.
- If you choose ULX, install its files using the package instructions and restart the server. Check the console output for errors, then test access with a designated administrator account. Keep the add-on’s configuration files with your server records so future changes can be traced to the right tool.
- Create permission groups around actual duties. For example, moderators might need tools to respond to player misconduct, while trusted administrators may need broader server controls. Give each group only the commands required for its role. This limits the impact of mistakes and makes permission reviews easier as your staff changes.
- Add administrators using the method supported by your chosen tool, then test each account in-game. Confirm that a moderator can perform moderation tasks without gaining unrelated controls. Remove former staff promptly and review inherited group permissions, especially when an account moves from a limited role to a senior one.
- Keep RCON credentials separate from player-facing files and messages. Anyone with remote console access can issue commands that affect server operations. Limit access to trusted operators, store the password securely, and rotate it after staff changes or suspected exposure. Garry’s Mod tracks failed RCON authentication attempts over 10 seconds.
- Use the in-game console for immediate checks and the server console for startup or operational messages. Record the command, time and result when investigating an issue. For example, if an admin action fails, check whether the account has the required group before changing server-wide permissions.
- Review Workshop add-ons before adding them to an admin setup. Check each item’s purpose and compatibility with your installed tools, then add it as a controlled change. If a new add-on affects permissions or moderation, test it with a non-owner account before relying on it during live play.
- Keep an access record with your configuration backups. Note each administrator’s account, assigned group and reason for access, then update the record when roles change. After an add-on update, test key moderation actions and check the console for errors. This helps you diagnose access problems without granting extra permissions.
Check for errors before treating the setup as ready. Set a strong RCON password in server.cfg, and keep it separate from player-facing files and messages. Limit knowledge of the password to trusted operators, store it securely, and change it after staff changes or suspected exposure. When investigating access problems, distinguish a failed admin permission from a failed remote-console login. The tools have separate roles, so changing a group may not resolve an RCON issue. Record password changes with the server configuration records, and check that the intended access method works after making an adjustment.
Twisted Servers
Twisted Servers offers Game Server Hosting for communities that want a hosted home for their Garry’s Mod server. If you need more control over the server environment, VPS Hosting or Dedicated Server Hosting may suit your setup. The right option depends on your intended player capacity, game mode, add-ons and how much server administration you want to manage. Your Garry’s Mod settings, including slots, Sandbox limits and admin permissions, still determine how the game server behaves.
When you’re ready to discuss hosting for your setup, contact Twisted Servers.
Build a server that can grow with your community
Your next step is to turn your current setup into a clear plan for the community you want to run. Decide which parts you want to manage yourself, how much control you need, and how your requirements may change as your player base and customisation grow. This gives you a stronger basis for choosing hosting and refining your Garry’s Mod server configuration over time.
Twisted Servers offers Game Server Hosting, VPS Hosting and Dedicated Server Hosting, providing options for different levels of server management and control. The right fit depends on your requirements and how you want to run your server, rather than a one-size-fits-all setup.
If you’re ready to discuss your requirements and next steps, talk with Twisted Servers about your server. A considered setup is a practical starting point for building the community you have in mind.
Frequently Asked Questions
What are the minimum system requirements for a Garry’s Mod server?
There is no fixed CPU, RAM or slot allocation that suits every server. Resource needs depend on player activity, game mode, maps and add-ons. A lightly customised Sandbox setup differs from a server running demanding Workshop content. Start with the workload you plan to host, then monitor resource use during busy sessions. If performance drops as activity increases, review the server load and adjust resources or configuration accordingly.
Which server.cfg settings are essential for a Garry’s Mod server?
Start with settings that control access, location and administration. Use sv_lan 0 for internet access, set sv_location to the server’s real region, and use sv_region 5 for the Australian example configuration. Set a strong RCON password to protect remote commands. Keep these values consistent with your launch options, then restart and inspect the console to catch settings that haven’t applied.
Disclaimer
Game titles, trademarks, logos and related assets are the property of their respective owners. Twisted Servers is an independent hosting provider and is not affiliated with or endorsed by the developers or publishers of the games mentioned unless otherwise stated. Information is provided as a general guide and may change as games, software and hosting services are updated.

