
Recommended Services


Supported Scripts

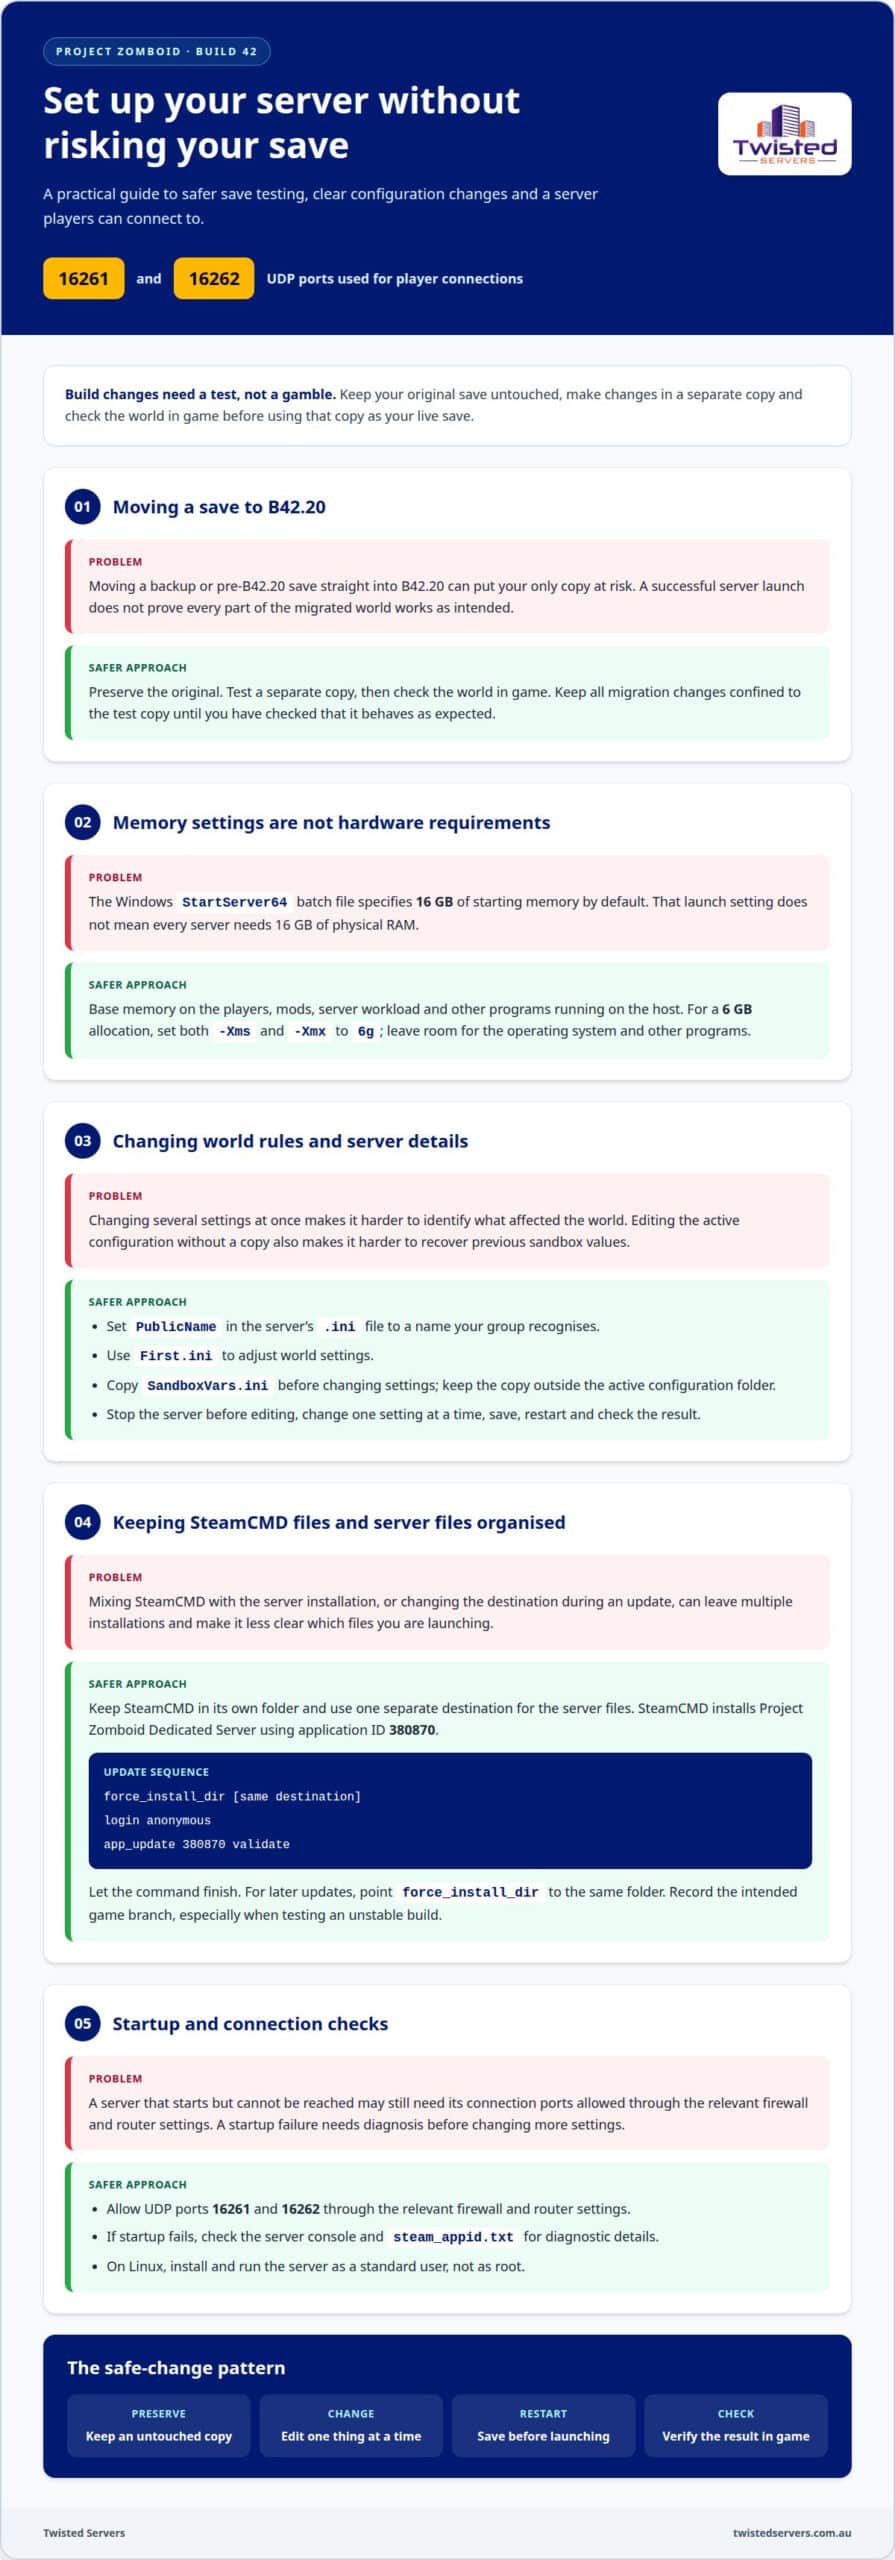
A Project Zomboid B42 server setup uses dedicated server files, configuration and two UDP ports: 16261 and 16262. If you’re considering moving a backup or a pre-B42.20 save into B42.20, preserve the original and test a separate copy first. Don’t treat a successful launch as proof that every part of the migrated world works as intended. Keep any changes confined to the test copy until you’ve checked it in game.
Changing builds raises a practical question: will your existing save still work as expected? Keep an untouched copy of the original so you can test the new build without risking your only save.
This guide explains how to prepare the server files, set a public name and world rules, and get the server ready for players. You’ll also learn how to approach mods, diagnose startup and connection issues, and make changes in a clear order so you can assess their effects.
Key Takeaways
- Set the public server name in the .ini file and adjust world settings in First.ini.
- Install the dedicated server through SteamCMD with Project Zomboid’s application ID, 380870.
- On Linux, run the server as a standard user rather than root, and find generated configuration files in the user’s Zomboid/Server folder.
- Allow UDP ports 16261 and 16262 through the relevant firewall and router settings so players can connect.
- If startup fails, check the server console and the steam_appid.txt file for the details needed to diagnose the issue.
Configuring game settings and server names
There is no single minimum or recommended hardware specification for every server. Memory needs depend on the players, mods and other processes running on the host. The server’s launch memory setting alone does not define the host’s full hardware requirements.
- Set the public server name. Open the server’s .ini file and set
PublicNameto a name your group recognises, such as “Weekend Co-op B42”. This is the name shown publicly, so avoid relying on a private nickname players won’t recognise. Save the file, then launch the server and check its displayed name. - Understand the Windows memory default. The Windows
StartServer64batch file specifies 16 GB of starting memory by default. Treat this as a launch setting, not a statement that every server needs 16 GB of physical RAM. The memory a particular host needs depends on its server workload and what else runs on that machine. - Set the Java memory values together. To configure the server with 6 GB, set both
-Xmsand-Xmxto6g.-Xmssets starting memory, while-Xmxsets the maximum. Keeping both at the intended value gives the server a consistent allocation. Leave room for the operating system and other programs using the host. - Adjust the world settings in First.ini. Use
First.inito change the Zomboid world settings. Review each sandbox option against the experience your group wants, from a harsher survival challenge to a more forgiving session. Change one setting at a time, save the file and record each edit. That makes it easier to identify which adjustment affected the world. - Keep a copy of the sandbox configuration. Save a copy of
SandboxVars.inibefore changing settings or troubleshooting mod auto-download problems. This lets you refer to the previous sandbox values instead of relying on memory. Give the copy a clear filename and store it outside the active configuration folder so it cannot be mistaken for the live file. - Apply configuration edits in a controlled order. Stop the server before changing
PublicName, memory flags or files such asFirst.ini. Save each edit before restarting, then check the server name and startup behaviour. If something changes unexpectedly, restore the last known settings before trying another adjustment. This helps isolate the cause.
There is no single minimum or recommended hardware figure in these details; memory needs depend on player count, mods, server workload and other programs on the host. The Windows launch setting of 16 GB is not a requirement for physical RAM.
Downloading server files through Steam or SteamCMD
SteamCMD installs the Project Zomboid Dedicated Server using application ID 380870. Keep its program files separate from the server installation so updates and troubleshooting remain organised.
-
Install SteamCMD
Download SteamCMD from Valve and extract its files to a dedicated folder. On Windows, use a simple path such as
C:SteamCMD, then run the SteamCMD executable from that location. Let its initial update finish before entering commands. Keep the extracted program files intact, and store the server files elsewhere. - Choose a destination for the server. Create a separate installation folder, such as
C:PZomboidServer. A dedicated destination makes it easier to distinguish the game server from SteamCMD and other game files. Use the same folder for later updates. Changing the destination can create a second installation instead of updating the original. -
Download and update server files
In SteamCMD, set the destination with
force_install_dir, then enterlogin anonymousandapp_update 380870 validate. The application ID selects Project Zomboid Dedicated Server. Thevalidateoption checks the installed files as SteamCMD updates them. Let the command finish before closing the program or trying to start the server. - Update the existing installation. For a later update, reopen SteamCMD and point
force_install_dirto the same destination folder. Runlogin anonymous, followed byapp_update 380870 validate. Don’t create a new destination for routine updates. Keeping one installation path reduces the chance of launching an older copy by mistake. - Keep the intended game build in view. The application ID identifies the dedicated server app, but does not specify which game build your group intends to use. Record the server branch selected for the installation and make sure your update process preserves it. This is especially important when testing an unstable build rather than another available version.
- Check the result before moving on. Let SteamCMD finish, then check the destination folder for the server files. If the expected installation is missing, confirm that
force_install_dirpoints to the intended location and run the update command again. Do not interrupt SteamCMD while it downloads or validates files.
Installing the Project Zomboid dedicated server
A Project Zomboid B42 server setup moves from downloaded files to a running instance, ready for its world configuration. Keep Linux server processes away from the root account, and assign separate UDP ports when running another instance.
-
Install on Windows or Linux
On Windows, open the server installation folder and run
StartServer64.batto start the dedicated server. On Linux, use a standard user account to install and run Project Zomboid; don’t run the server as root. Keep the installation directory distinct from the SteamCMD folder. This makes the server files easier to identify and manage. - Locate the generated configuration files. Start the server to generate its configuration files in the user’s
Zomboid/Serverfolder. On Linux, the account running the server has its own configuration directory. If you switch accounts, check that account’s home folder rather than looking under root. - Run an initial startup. Launch the installed server and let its first startup finish before making further changes. This creates the
Zomboid/Serverconfiguration folder and gives you a baseline for identifying startup problems. If the server exits early, save the console output. It can help distinguish a failed launch from a successful startup. -
Install Workshop mods
Add mod details through the server’s .ini configuration file, using the
Modssetting. Match the entries to the mods your players intend to use, then save the file and restart the server. Most mods won’t work with Project Zomboid’s unstable version, so a mod list suited to another build can prevent a B42 server from starting or behaving as expected. - Give a second instance its own ports. A second Project Zomboid server instance can use UDP ports
16274and16275, provided both are open on the server. Assign those ports to the additional instance rather than reusing the first instance’s ports. Record which pair belongs to each instance so players can connect to the intended world. - Test each instance separately. Start the first server and confirm it remains running before launching the second. Then start the additional instance with its separate port pair. For a Project Zomboid B42 server setup with multiple worlds, this separation helps you identify which instance has a startup or configuration problem. If one fails, stop it and review its output before changing the working instance.
Required UDP ports and firewall forwarding
Each Project Zomboid server instance needs two unoccupied UDP ports. For one instance, forward UDP ports 16261-16262 from your router to the host computer’s local IPv4 address.
- Identify the server’s local IPv4 address. Find the address assigned to the computer running Project Zomboid, then use that address as the forwarding destination. The router sends incoming traffic to this local address, not directly to the server’s public address. Keep the destination consistent; if the host’s local address changes, the forwarding rule may point to the wrong device.
- Allow UDP traffic through the host firewall. Add inbound rules for UDP ports 16261 and 16262 on the computer running the server. Select the UDP protocol, rather than TCP, and apply the rules to the relevant network profile. A router forwarding rule cannot by itself override a firewall rule that blocks the same traffic on the host.
- Forward the default port pair on your router. Open the router’s port-forwarding settings and create rules for UDP 16261 and UDP 16262. Set the destination to the host computer’s local IPv4 address. The guide’s recommended range is UDP 16261-16262; forward both ports for the Project Zomboid server instance.
- Keep the browser port in mind. The server browser uses port 16261 by default when adding a Project Zomboid server. Check the server’s UDP port requirements for the type of connection you use. Use the relevant port when entering server details, and don’t assume that forwarding only the browser port covers direct connections.
- Reserve separate ports for another instance. Each instance requires two unoccupied UDP ports. Don’t assign the same pair to two running servers, as both instances need their own available ports. For a second instance, the documented example is UDP ports 16274 and 16275, provided you also open them on the server.
- Test the rules from outside the host network. Start the Project Zomboid server, then have a remote player attempt to connect using the host’s global IP address and port 16261. A connection attempt from the host computer alone may not demonstrate that router forwarding works for external players. Check both the router destination and host firewall rules if the remote connection fails.
- Match every rule to the correct instance. Record each instance’s UDP pair alongside its server name and local host address. For example, keep the primary server on 16261-16262 and the second on 16274-16275. This makes it easier to spot a port conflict and ensures each router rule targets the intended Project Zomboid server.
Troubleshooting Build 42 startup and connection issues
Build 42 unstable should be treated as a test environment, not assumed stable for every setup. To connect to an unstable server, run Project Zomboid’s unstable build client and match the server’s branch.
- Launch the server from its installed files. On Windows, run
StartServer64.batfrom the server folder. On Linux, start the dedicated server as a standard user, not root. Keep the console visible during startup; its output helps distinguish a launch failure from a server that has started. Don’t close the console before checking its status. - Check the console for a completed startup. Look for confirmation that the server has started and Steam is enabled. If either message is missing, note the surrounding console output and address the first reported error before changing settings. This gives you a clear starting point for troubleshooting without changing several files at once.
- Check the application ID file if startup fails. In the Build 42 startup troubleshooting procedure,
steam_appid.txtshould contain108600on one line. Open the file in the server installation folder, remove any other text, and save it with that single number. Restart the dedicated server and review the console output again. - Match the game client to the server branch. A player joining an unstable server needs to run Project Zomboid’s unstable build client. If the client and server use different branches, bring them onto the same build before troubleshooting ports or configuration. For a group prioritising predictable play, avoid assuming unstable Build 42 will behave like a stable release.
- Test connection ports from a remote computer. Check that the server’s required connection ports are open before troubleshooting other network settings. Ask a remote friend to connect to the host’s global IP address using port 16261, not the host’s local IP. If that attempt fails, revisit the router forwarding destination and the host firewall rules.
- Isolate mod download problems. Most mods won’t work with Project Zomboid’s unstable version. If errors begin after adding Workshop items, test startup without the mod list. For mod auto-download problems, back up relevant settings before making changes. You can then restore the sandbox settings for the world.
- Change one cause at a time. After correcting
steam_appid.txt, changing a mod entry or adjusting a firewall rule, restart the server and record the result. If a local connection works but a remote friend still can’t join, check the global IP, UDP forwarding and firewall path next.
Build 42 unstable is a test environment and shouldn’t be assumed stable for every setup. A server using the unstable branch should be matched by clients running the unstable build; keep the client and server on the same branch.
Twisted Servers
Twisted Servers offers hosting for gaming communities that want server resources without maintaining a computer at home. Game Server Hosting, VPS Hosting and Dedicated Server Hosting suit different needs, depending on how you plan to manage the server and its files. Choose based on your intended setup, operating system and desired level of control.
If you’re weighing a self-managed server against hosted infrastructure, we can help you discuss which hosting option fits your requirements. Share that you’re planning a Project Zomboid Build 42 server, along with your preferred build and whether you need to manage the server files yourself. Contact Twisted Servers to discuss your hosting needs.
Choose how you want to run your server
Your next decision is how much of the hosting environment you want to manage yourself. A Project Zomboid B42 server setup can be run on your own computer or hosted separately, with the right approach depending on your preferred level of control and the time you want to spend maintaining it.
Twisted Servers provides Game Server Hosting, VPS Hosting and Dedicated Server Hosting for different setups. Decide whether you want a game-focused hosting option or broader control over the server environment, then choose what fits your group. When you’re ready, get started with the hosting option that suits your setup.
Ask Twisted Servers about hosting and discuss the option that fits your plans. Your Build 42 world is ready for its next chapter, and you can move forward at a pace that works for you.
Frequently Asked Questions
What will this guide be about?
This guide explains how to prepare and run a Project Zomboid Build 42 dedicated server. It covers downloading server files, choosing basic world settings, installing mods, assigning ports and diagnosing startup or connection trouble. For example, you’ll see how to distinguish a server launch problem from a remote connection issue. It also helps you consider whether to run the server yourself or use a hosting option.
How do I configure B42 server settings, player slots, password and admin access?
Configure the server using files in the user’s Zomboid/Server folder, and set its browser name with PublicName. World settings are stored in First.ini. Manage player slots, passwords and admin access through the relevant server settings and game admin tools. Check the effect of any value before copying it from another build. Back up edited files so you can restore the configuration if a change causes problems.
Which ports must be opened for a Project Zomboid B42 server, and how do I configure firewall rules?
Allow UDP ports 16261 and 16262 for a standard server instance. Create inbound UDP rules in the host firewall, then forward those ports through your router to the server computer’s local IPv4 address. The ports a server uses depend on its setup, so check the configuration and allow the required traffic through your firewall and router. Test with a remote player using the host’s global IP address.
How do I install and manage mods on a Project Zomboid B42 dedicated server?
Add mod entries to the server’s .ini configuration using the Mods setting, then restart the server. Make sure players use compatible mods and the same game build as the server. Most mods won’t work with Project Zomboid’s unstable version, so test changes carefully instead of adding many at once. If a mod causes errors, remove the latest entry and restart to isolate the problem.
How do I back up, restore and migrate a Project Zomboid B42 server world?
Stop the server before copying world data or configuration files, so they do not change during the copy. Store the backup separately from the live installation, including the settings needed to recreate the world. To restore or migrate, place the copied files in the matching server location, start the same game build and check the console. Keep a copy of SandboxVars.ini before troubleshooting mod auto-download issues or deleting the Zomboid folder.
What common B42 server setup errors occur, and how can I fix them?
Common causes include a mismatched game branch, incompatible mods, missing UDP forwarding and incorrect startup files. Run the unstable client when joining an unstable server, and check the server console for confirmation that startup completed and Steam is enabled. If startup fails, make sure steam_appid.txt contains 108600 on one line. For remote connection failures, check firewall rules and use the host’s global IP, not its local address.
Disclaimer
Game titles, trademarks, logos and related assets are the property of their respective owners. Twisted Servers is an independent hosting provider and is not affiliated with or endorsed by the developers or publishers of the games mentioned unless otherwise stated. Information is provided as a general guide and may change as games, software and hosting services are updated.

