
Recommended Services


Supported Scripts


Running a persistent multiplayer world on your everyday home connection is an uphill battle that almost always ends in unplayable lag. You’ve likely dealt with frustrating rubber-banding, sudden desync during peak evening hours, and the endless confusion of router firewalls and port forwarding. Sharing your personal home IP address with external players only adds unnecessary security anxiety. If you want to discover how to set up minecraft server dedicated hosting that stays reliable around the clock, separating your game logic from residential internet is the single best decision you can make.
You shouldn’t have to fight complex network settings or watch your tickrate collapse just to play together. In this guide, you will gain a clear understanding of hardware requirements, essential security protections, and local infrastructure that delivers responsive performance across Australia. We’ll walk you through the core configuration steps and administrative essentials so your community world remains stable, secure, and ready for adventure 24/7.
Key Takeaways
- Learn how to set up minecraft server dedicated infrastructure to eliminate the power bills, hardware strain, and network bottlenecks of running on a home computer.
- Match your software runtime with current Java release requirements and target high single-thread CPU speeds to protect server tickrates during peak activity.
- Choose the right platform for your gameplay style by weighing the lightweight efficiency of vanilla and Paper against the flexibility of Fabric and Forge.
- Navigate Australian networking hurdles like Carrier-Grade NAT (CGNAT) and port forwarding to protect your home IP address from external threats.
- Implement automated daily off-site backups and command-line diagnostics to ensure your multiplayer world stays healthy and scales smoothly as player numbers grow.
Understanding Dedicated Minecraft Servers: Self-Hosting vs Dedicated Hardware
A true dedicated server environment isolates world calculations, chunk loading, and player states entirely onto unshared, production-grade infrastructure. When learning how to set up minecraft server dedicated software properly, the distinction between a repurposed spare computer and enterprise hardware quickly becomes evident. While running an official Minecraft server package on a home machine provides initial control, domestic hardware rarely delivers the consistent tickrates and stable connectivity that active multiplayer groups expect.
The Reality of Self-Hosting on Residential Connections
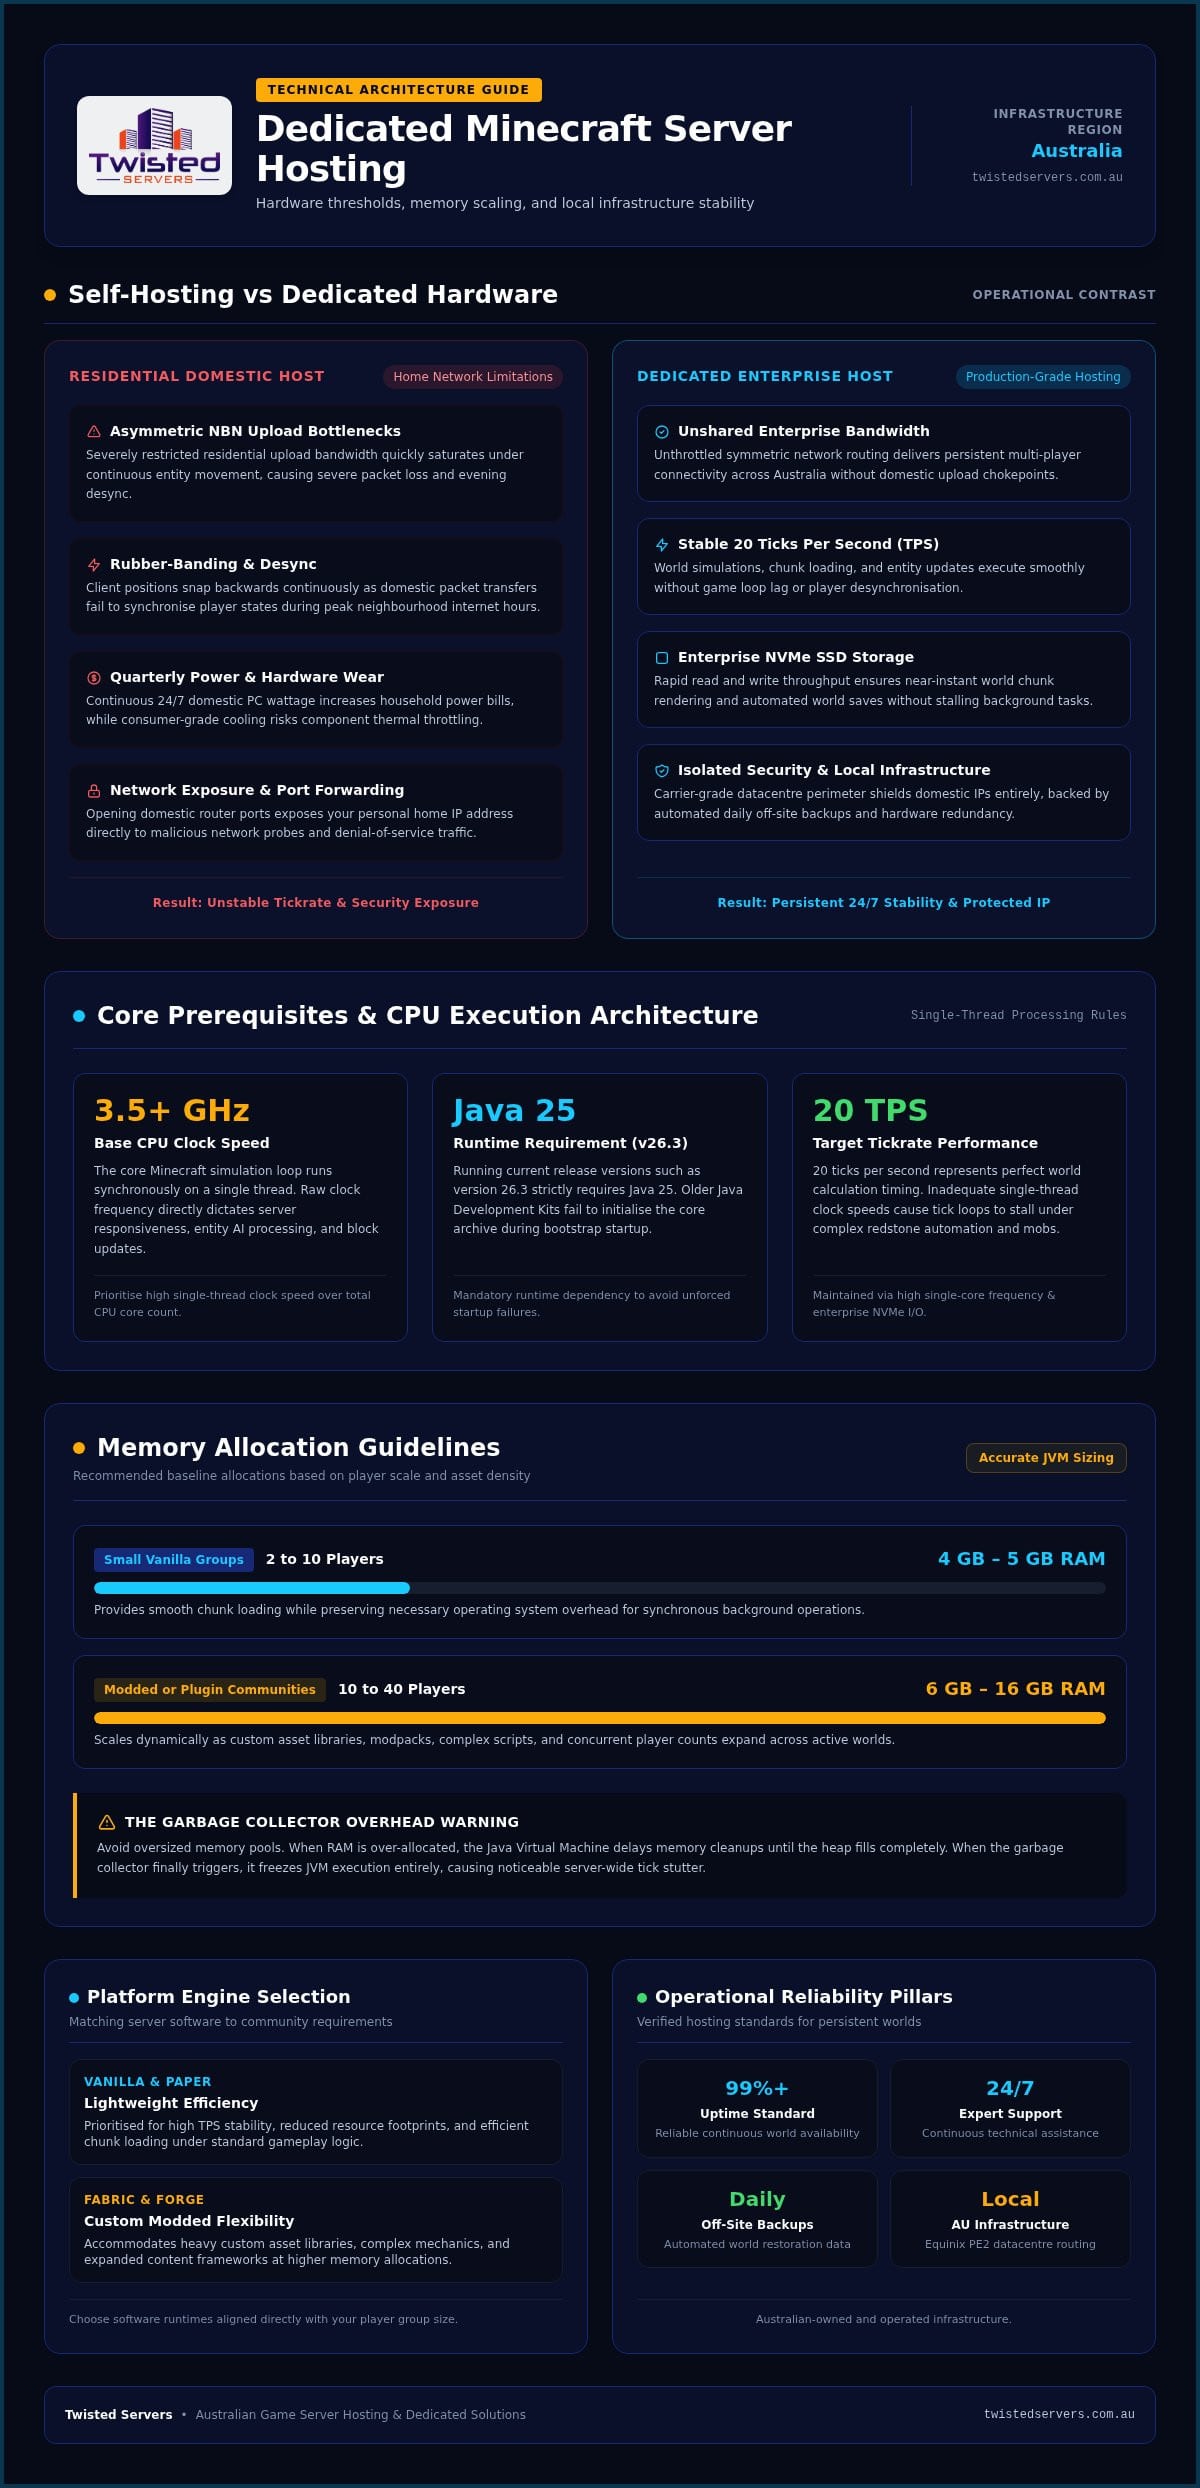
Most Australian residential NBN connections rely on asymmetric bandwidth profiles. Download speeds are prioritised while upload rates remain severely limited. Because every connected player demands continuous packet transfers for entity movement and block updates, restricted residential upload bandwidth quickly saturates. This bottle-necking triggers severe packet loss, visual Rubber-banding, and frequent client Desync during busy evening periods.
Beyond bandwidth limitations, continuous self-hosting exposes hidden practical costs:
- Electricity expenses: Running a consumer desktop 24/7 draws continuous wattage, leading to significant additions to quarterly household power bills.
- Hardware wear: Domestic motherboards and consumer cooling fans are not designed for sustained non-stop loads, increasing the risk of thermal throttling or sudden component failure.
- Network vulnerability: Opening router ports directly to your home network exposes your household IP address to malicious probes and distributed denial-of-service traffic.
Advantages of Running on Dedicated Server Infrastructure
Purpose-built server platforms eliminate these domestic bottlenecks by combining high-frequency processors with unthrottled data pipes. Minecraft’s core execution loop runs predominantly on a single thread. This means raw clock speed directly dictates whether your world maintains a stable 20 ticks per second (TPS) or grinds to a halt under redstone automation.
Enterprise NVMe SSD storage delivers the rapid read and write throughput required for near-instant chunk rendering and world saves without stalling background tasks. When you look into how to set up minecraft server dedicated environments, leveraging professional dedicated server hosting for gaming ensures your community benefits from local infrastructure, carrier-grade network routing, and automated hardware failovers designed for persistent 24/7 multiplayer stability.
Essential Prerequisites and System Requirements for Minecraft Dedicated Servers
Before launching a multiplayer instance, establishing the correct runtime dependencies and baseline computing resources prevents unforced errors during startup. Understanding what is a dedicated server from a hardware level helps clarify why modern releases require targeted resources. If you are learning how to set up minecraft server dedicated hosting for current releases such as version 26.3, you must run Java 25. Older Java Development Kits will simply fail to initialise the core archive.
Determining CPU and Memory Allocations
Clock speed matters far more than total core count. The primary simulation loop operates synchronously on a single thread. Look for processors offering base frequencies of 3.5 GHz or higher to avoid game loop lag when processing entity AI and complex block changes.
Memory allocations require a careful balance based on your player community:
- Small Vanilla Groups (2 to 10 players): A baseline of 4 GB to 5 GB of RAM ensures smooth chunk loading while leaving operating system headroom.
- Modded or Plugin Communities (10 to 40 players): Allocate between 6 GB and 16 GB of RAM, scaling upward as custom asset libraries expand.
Avoid the temptation to assign arbitrary, oversized memory pools. If you over-allocate RAM to Java, the garbage collector delays memory cleanups until the heap fills completely. When it finally triggers, the JVM freezes execution entirely, causing noticeable tick stutter across the whole server.
Operating System Selection: Linux vs Windows
Operating system selection directly influences how much host hardware remains available for your game instance. Windows Server provides familiar graphical interfaces and straightforward file management, but the desktop environment consumes noticeable background memory and processing cycles.
Headless Linux distributions like Ubuntu Server or Debian run without graphical interfaces. They operate via SSH, directing nearly all system capacity straight into Java execution. Pairing a lightweight Linux installation with enterprise NVMe SSD storage minimises disk read times whenever players explore ungenerated chunks at high speeds.
If you prefer skipping manual environment configuration and Java version matching entirely, our streamlined game server hosting provides fully managed infrastructure tuned specifically for optimal Minecraft performance.
How to Install and Configure Your Dedicated Server Files
Setting up your game instance begins with picking the right software core for your community. Once you understand how to set up minecraft server dedicated software properly, the installation process follows a clean, repeatable procedure across both Windows and headless Linux systems.
Choosing Your Server Software Core
Your choice of server core directly determines overall stability and modding support. Downloading directly from official project repositories protects your environment from compromised code:
- Official Vanilla JAR: Mojang’s stock release gives you pure mechanics without modifications, but lacks modern multi-threaded asynchronous optimisations.
- Paper: A high-performance fork designed for plugin ecosystems. Paper fixes common exploits, optimizes light calculations, and significantly reduces single-core CPU load.
- Fabric and NeoForge: Essential modding loaders required if you plan to install custom blocks, dimensions, or technical machine mods across your server.
Step-by-Step Initial Startup and EULA Acceptance
Start by creating an isolated folder on your drive, such as /opt/minecraft/server or C:MinecraftServer, to keep worlds separate from system files. Move your chosen server executable into this folder and open your command prompt or terminal.
Execute your initial boot command:
java -Xms2G -Xmx4G -jar server.jar nogui
The server will unpack baseline assets, create supporting folders, and stop immediately. This planned shutdown occurs because the End-User License Agreement remains unsigned. Open the newly generated eula.txt file in a text editor, locate the line reading eula=false, and change it to eula=true to satisfy Mojang’s licensing terms before restarting.
Fine-Tuning server.properties and Launch Arguments
Opening server.properties allows you to adjust simulation parameters to balance visual fidelity with tick consistency. Modifying these specific values protects your processing capacity:
view-distance: Controls how many chunks the server delivers to connected clients. Lowering this from 10 down to 7 or 8 noticeably decreases memory usage without spoiling sightlines.simulation-distance: Governs the tick radius for mob AI, crops, and redstone mechanics around players. Reducing this value to 5 or 6 relieves immense single-thread pressure.network-compression-threshold: Setting this to256or512compresses outgoing packets, saving precious bandwidth on connections with multiple concurrent players.
When refining how to set up minecraft server dedicated startup scripts, lock minimum (-Xms) and maximum (-Xmx) heap allocations to the same value. Doing so prevents dynamic memory resizing during active gameplay, keeping resource availability predictable and smooth.
Networking, Port Forwarding, and Network Security Protections
Routing internet traffic cleanly to your game instance is where most home setups encounter friction. Learning how to set up minecraft server dedicated networking requires configuring your internal local network, handling Australian ISP restrictions, and shielding your hardware from unwanted traffic. By default, Java Edition dedicated servers listen for incoming TCP connections on port 25565.
Navigating Local Port Forwarding and Static IPs
Your server needs a permanent local IP address so incoming traffic always knows where to go. Access your router’s administration interface, locate the DHCP settings, and assign a permanent IP reservation to your server’s network adapter. This prevents internal IP reassignment whenever your machine reboots.
Next, navigate to your router’s port forwarding section. Create a rule directing incoming traffic on external TCP port 25565 straight to your server’s reserved local IP on internal port 25565. You must also configure your local operating system firewall, adding an inbound rule that permits TCP traffic on port 25565 through Windows Defender Firewall or via ufw allow 25565/tcp on Linux.
In Australia, many retail internet service providers use Carrier-Grade NAT (CGNAT) by default to manage IPv4 shortages. Under CGNAT, several households share one public IPv4 address, which prevents external players from reaching your local router entirely. If your router’s WAN IP does not match the public address displayed on IP check tools, you must contact your provider to opt out of CGNAT or purchase a static public IP address.
Safeguarding Your Network Against Online Attacks
Handing out your personal home IP address to players across the internet creates genuine security risks. A single disgruntled player can target your connection with distributed denial-of-service traffic, overwhelming your home modem and taking your entire household offline for hours.
Setting up advanced firewalls helps drop suspicious packets before they exhaust local system resources, but consumer routers cannot absorb heavy volumetric attacks. Professional hosting platforms isolate this risk entirely. We protect our community using multi-layered DDoS defence and Arista Edge Threat Management across our game server hosting platform, actively scrubbing hostile traffic at the network edge so your world stays online.
If you prefer complete control over custom network configurations without endangering your private home connection, deploy our flexible unstoppable VPS hosting to build your ideal server environment with dedicated enterprise throughput.
Long-Term Server Maintenance, Backups, and Scalability Solutions
Maintaining an active multiplayer world requires ongoing operational care well after the initial launch. Knowing how to set up minecraft server dedicated software is only the first milestone. Protecting player creations, keeping tickrates rock-solid, and preventing world corruption over months of exploration demands routine housekeeping, active resource tracking, and dependable administrative controls.
Automating Scheduled Backups and World Data Integrity
World corruption can happen unexpectedly when a system crashes during an unwritten chunk save. Setting up automated scripts or scheduled tasks to generate daily off-site archives shields months of collective player effort from sudden hardware faults. Pair these backups with automated server restarts during low-traffic early morning hours. Scheduled restarts clear out accumulated memory bloat and built-in caching, helping to reset execution loops and prevent mid-game Desync.
Over time, continuous player travel inflates world directory sizes to tens of gigabytes. Using external pruning tools like MCA Selector allows administrators to safely trim unpopulated chunks generated by brief fly-throughs, keeping storage footprints tight without damaging established bases or community builds.
Upgrading to Managed Australian Hosting Infrastructure
Self-managed setups inevitably run into bottlenecks as your player community grows, redstone builds multiply, and large-scale mob farms activate. When command-line diagnostics like top or Minecraft profiling tools like Spark show consistent single-thread saturation and declining TPS, your host hardware has hit its ceiling.
Migrating your save files to Twisted Servers dedicated hosting provides complete physical hardware isolation, unthrottled bandwidth, and enterprise reliability. Deploying your instance on local infrastructure within high-tier Australian datacentres keeps latency low and responsive for players nationwide. With our dedicated expert support available 24/7 and full Root Access at your fingertips, you can scale your multiplayer world with confidence while leaving complex network maintenance behind.
Build a Better Multiplayer Experience Today
Mastering how to set up minecraft server dedicated software comes down to matching your server core to your community’s goals, balancing memory allocations, and securing your network. While self-hosting offers an informative technical project, moving beyond domestic upload limits, CGNAT complications, and hardware fatigue gives your community the space to thrive without performance compromises.
With local Australian datacentre infrastructure delivering low-latency nationwide routing, standard DDoS defence, and Arista Edge Threat Management actively filtering malicious traffic, keeping your world online does not have to be stressful. You can deploy an Australian dedicated Minecraft server with Twisted Servers backed by dedicated expert support available 24/7. Focus on creating memorable builds and exploring new horizons with your friends, knowing your multiplayer world is running on reliable, purpose-built hardware.
Frequently Asked Questions
Can I host a dedicated Minecraft server on my personal gaming computer?
Yes, but running a server alongside your active gaming client forces both applications to compete for identical CPU cycles, memory, and thermal limits. When exploring how to set up minecraft server dedicated environments on a single PC, background tasks can drag down tickrates during intense action. It works well for quick testing, but dedicated hardware provides the isolated power needed for persistent, uninterrupted multiplayer sessions.
How much RAM does a dedicated Minecraft server require in 2026?
A small vanilla server supporting 2 to 10 players typically needs 4 GB to 5 GB of RAM to run comfortably on modern releases. If you run heavier modpacks or extensive plugin suites for up to 40 players, you will want between 6 GB and 16 GB. Avoid giving Java excessive memory, as over-allocating heap space triggers garbage collection spikes that momentarily freeze your entire world.
What happens if my Australian ISP uses Carrier-Grade NAT (CGNAT)?
Carrier-Grade NAT pools hundreds of household connections behind a single shared public IP address, which prevents external players from connecting through your forwarded router ports. If your router’s WAN address doesn’t match your public IPv4 address, inbound player traffic gets dropped upstream. You’ll need to contact your internet provider to opt out of CGNAT or purchase a static IP address to host accessible games.
Is running a dedicated Minecraft server safe on a home internet connection?
Hosting from home carries real security risks because players must connect directly to your household IP address. Sharing your residential address publicly exposes your domestic network to port scanners and disruptive DDoS attacks that can knock your home offline for hours. If you host locally, configure strict firewall rules, keep your system updated, or use external hosting equipped with enterprise DDoS filtering to stay protected.
Can Bedrock and Java edition players join the same dedicated server?
Standard vanilla servers cannot communicate across both editions simultaneously, but you can bridge the gap using third-party translation tools like GeyserMC. Geyser translates network packets between Bedrock and Java protocols, enabling cross-play on Paper or Fabric servers. If you don’t want to manage translation proxies, you can run separate instances, as dedicated server packages are readily available for both Java and Bedrock editions.
Why do players experience rubber-banding and desync on self-hosted servers?
Rubber-banding and desync typically stem from asymmetric residential upload limits or insufficient single-core CPU speeds under heavy simulation loads. When home upload bandwidth saturates or a processor can’t calculate entity logic within the standard 50-millisecond tick window, positional updates lag behind client predictions. The server snaps players back to verified coordinates once packets finally arrive, creating noticeable visual stuttering across the world.
How do I automatically start my dedicated Minecraft server when the machine reboots?
On Linux systems, you can create a custom systemd service unit to automatically execute your launch script on system boot. When refining how to set up minecraft server dedicated automation, systemd monitors the Java process and triggers instant restarts if the instance crashes or the machine reboots. On Windows, you can configure Windows Task Scheduler with a boot trigger pointing directly to your startup batch file.
Disclaimer
Game titles, trademarks, logos and related assets are the property of their respective owners. Twisted Servers is an independent hosting provider and is not affiliated with or endorsed by the developers or publishers of the games mentioned unless otherwise stated. Information is provided as a general guide and may change as games, software and hosting services are updated.

