
Recommended Services


Supported Scripts

Killing Floor 2’s default Survival co-op mode supports six players, so check your intended player limit before setup. A Killing Floor server setup involves installing the dedicated server files and configuring the server so players can join. It’s easy to get caught between configuration files, server profiles and port forwarding, especially when the two games use different settings. This guide walks you through the process, from checking the Killing Floor 2 server requirements and installing files with SteamCMD to choosing difficulty and wave settings, opening the required ports and testing the connection. You’ll also see how the setup differs between Killing Floor and Killing Floor 2, so you can follow the steps that match the game you want to host.
Key Takeaways
- Use the correct SteamCMD app ID: 215350 for Killing Floor or 215360 for Killing Floor 2.
- Set difficulty and wave length in the game’s configuration files to shape the server experience.
- Plan server resources around the game; the Killing Floor 2 guide recommends a 2.2 GHz processor with 2 cores, 4 GB RAM and 10 GB free storage.
- Forward the ports required by your game and configuration so players can connect and the server can appear in browser listings.
- Test the server after installation and configuration, then adjust settings if players can’t connect or the experience doesn’t match your chosen profile.
Game server control panel and configuration editor
- Launch the server once to generate its files. After installing Killing Floor 2 with KF2ServerTool, start the server before editing settings. This first launch creates the configuration files the server needs. Stop the process cleanly, then open the server directory and locate those files. Editing before this first run can leave you with no generated settings to change.
- Keep each server configuration in its own directory. Separate folders make it easier to manage different maps, mods and settings without confusing one setup with another. For an existing Windows server, KF2ServerTool can be used by extracting its files into the server folder. Keep a copy of the original configuration before making changes, so you can restore it if a setting prevents the server from starting.
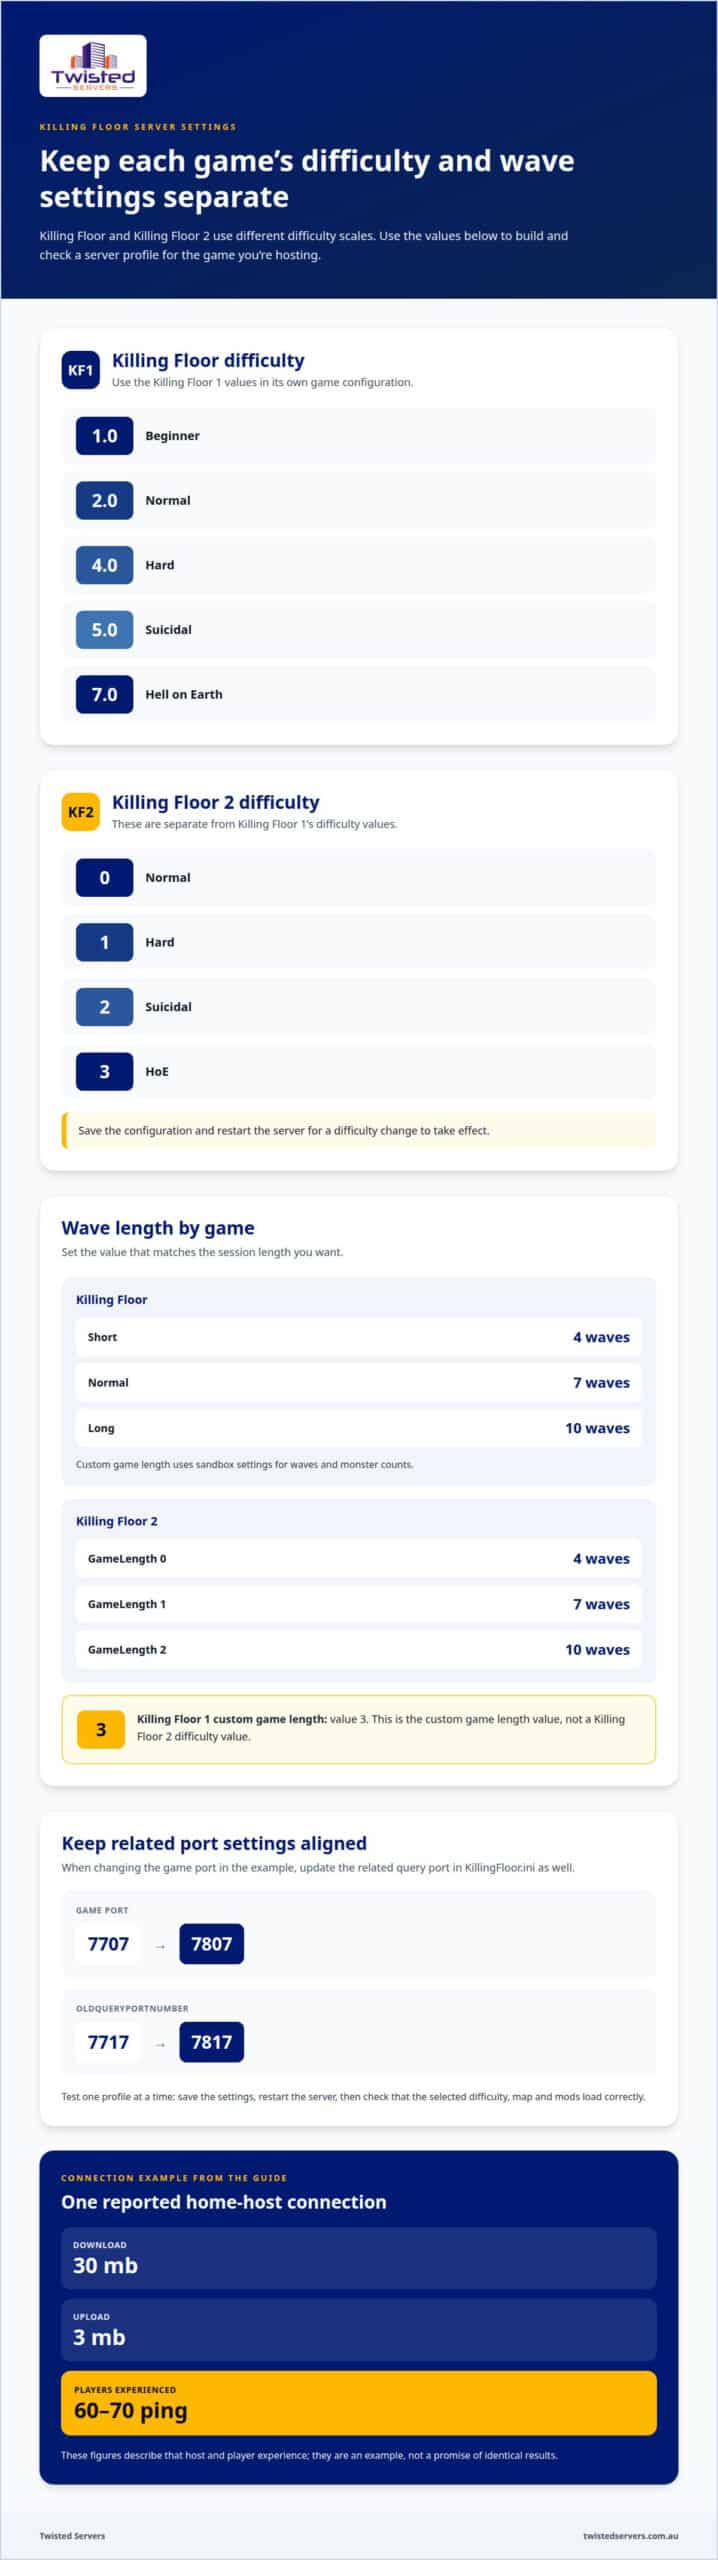
- Set difficulty in the Killing Floor 2 configuration. The difficulty values are 0 for Normal, 1 for Hard, 2 for Suicidal and 3 for HoE. Choose the value that suits your group, then save the configuration and restart the server for the change to take effect. Avoid copying a value from Killing Floor 1, which uses a different difficulty scale.
- Configure Workshop downloads in KF2ServerTool. Open the Options tab and enable the Workshop Download Manager when you want the tool to manage Workshop downloads. KF2ServerTool can install or update maps and mods from the Steam Workshop or a custom redirect. After downloads finish, review the server’s map and mod configuration, then launch it and check that the selected content loads.
- Set custom paths for separate installations. KF2ServerToolCMD’s configuration file can specify custom paths for the KFEngine and KFGame directories. Use those path settings to point the tool at the intended server files, particularly when managing multiple installations. Running KF2ServerToolCMD with
-listcreates aKF2ServerToolCMD.inifile; use-helpto display available commands. - Test each profile before listing it in the browser. Start one configuration at a time and confirm its chosen difficulty, map and mods load correctly. If you change a port, update every related value: for example, changing the game port from 7707 to 7807 means changing
OldQueryPortNumberfrom 7717 to 7817 inKillingFloor.ini. This keeps the edited configuration aligned with its port settings.
Keep the Killing Floor 1 notes distinct from the Killing Floor 2 settings above, since they describe separate game-specific details. In Killing Floor 1, the Custom game length setting uses sandbox settings for waves and monster counts; its value is 3. Treat that as the custom game length value, not as one of the Killing Floor 2 difficulty values. Killing Floor 1 custom map files can also be compressed with the UCC compress command into .uz2 files. Keep this map preparation note alongside the relevant Killing Floor 1 information so it is not confused with the Workshop download settings.
Connection figures are best presented as an example rather than a promise of identical results. The guide reports that a host with 30 mb of download and 3 mb of upload had players experience 60-70 ping. Keep those figures together when considering the report: the download amount, upload amount and observed ping describe the same host example. They offer context for players assessing a server connection, while the report is specific to that host and player experience. Keeping this note separate from configuration values helps avoid treating network figures as server settings.
Server profiles and custom settings
Yes, you can host a Killing Floor server on a home internet connection in Australia if inbound traffic can reach it. The main risks are unstable latency, limited upload capacity, interruptions to your connection and exposing game ports to incoming traffic.
- Choose a profile before changing settings. Decide whether your group wants shorter rounds, longer sessions or a harder challenge. Keep the profile’s map, difficulty and wave choices together in one configuration. That makes each setup easier to run consistently and helps you identify which setting to update when the server behaves differently from your plan.
- Set Killing Floor 1 difficulty using its own scale. In the game configuration,
GameDifficulty 1.0means Beginner,2.0means Normal,4.0means Hard,5.0means Suicidal and7.0means Hell on Earth. Select one value for the intended challenge. Don’t copy Killing Floor 2’s difficulty values into this configuration. - Match wave length to the session. Killing Floor 1 offers Short with 4 waves, Normal with 7 waves and Long with 10 waves. Its Custom game length uses sandbox settings for waves and monster counts. Killing Floor 2 maps
GameLengthvalues 0, 1 and 2 to 4, 7 and 10 waves respectively. Set the value that matches your intended session length. - Apply and test one profile at a time. Save the configuration, restart the server and check the running match before changing another setting. This isolates the cause if the game loads the wrong difficulty or wave length. For example, change the wave setting, restart, then confirm the next match follows that profile.
- Configure a UDP tunnel as a matching route. A UDP tunnel carries game traffic between an external endpoint and your server. Set its destination to the server’s address and game port, then make sure the tunnel and server use matching port settings. A mismatch can stop players reaching the game, even when the server itself is running.
- Check the game’s UDP ports when testing access. Check which UDP ports the game uses and which ones your router needs forwarded. Apply only the mappings required by your chosen game and tunnel. Test from outside your home network, since a local console connection doesn’t prove external access works.
- Review home-network exposure after each change. Forwarding a port allows traffic to reach the server through your router, so avoid forwarding unrelated ports. Keep the server software updated and limit access to the settings you need. If other household devices share the connection, their activity can also affect available upload capacity and players’ experience.
Killing Floor dedicated server requirements
For Killing Floor 1, install SteamCMD, use a Steam account, install app ID 215350, configure the server, then launch it.
For Killing Floor 2, install SteamCMD, use app ID 215360, configure the files, then start the dedicated server.
The Killing Floor 2 recommendation is a 2.2 GHz processor with 2 cores, 4 GB RAM and 10 GB free storage. Bandwidth needs depend on player activity, upload capacity and connection stability.
The default Webadmin login name is admin, and the guide gives 123 as its password. Change default credentials before opening Webadmin to public access.
- Choose the game version and operating system. The guide describes deploying Killing Floor 2 on Windows Server 2019. On Linux,
apt-get install steamcmdis one way to install SteamCMD. Use the option that matches your server environment, then keep the game files and configuration in the intended directory. - Install the dedicated server files with SteamCMD. A Steam account is required to download the Killing Floor dedicated server through SteamCMD. Use app ID 215350 for Killing Floor or 215360 for Killing Floor 2. Keep the two installations separate so their files and settings don’t get mixed.
- Match resources to the Killing Floor 2 recommendation. Allow for a 2.2 GHz processor, 2 cores, 4 GB RAM and 10 GB free storage. These are the guide’s recommended server specifications, not a bandwidth figure. Upload capacity and connection stability affect how well players can connect during a session.
- Set the player limit in the launch configuration. The example Killing Floor server launch command permits a maximum of 6 players. For Killing Floor 2, the default Survival co-op mode also supports six players. Set the limit for your intended group, then check that the selected mode and server configuration agree.
- Launch once, then inspect the result. Start the server after installation so it can create its configuration files. Review the startup output for errors, confirm the chosen map and settings load, then check that the server appears in the browser. A clean launch is a useful first test, but external access also depends on network configuration.
- Secure administrator access before inviting players. The default Webadmin login name is
admin, and the guide gives123as its password. The Killing Floor server’s default launcher arguments also set the admin password to123. Replace default credentials with a private password, and store it separately from public server details. - Recheck administration after map changes. Killing Floor 1’s server admin login may need to be repeated after every map change. If Webadmin access stops working during a rotation, log in again and confirm the server remains under administrator control. Keep admin credentials out of player-facing messages and server listings.
Required network ports
To troubleshoot connection, firewall and NAT issues, confirm the server’s configured ports, then allow them through the operating system firewall and router. Test from outside your local network: connecting from the same network does not prove external access works.
- Record the ports for your game version. Killing Floor 1 uses UDP port 7707 for gameplay, UDP port 7708 for queries, UDP port 7717 for its default GameSpy service and UDP port 20560 for its default Steam service. Its default Web Admin interface uses TCP port 8075. Keep the protocol beside each port when adding firewall rules.
- Allow the Master Server Browser connection. Killing Floor 1 uses TCP and UDP port 28852 for its default Master Server Browser. Add both protocols if you need the server to communicate with that browser. A rule allowing only UDP or only TCP may leave part of that connection unavailable.
- Forward Killing Floor 1 gameplay ports through NAT. A host may need to forward UDP ports 7707, 7708 and 7717 on its router so friends can connect. A router’s forwarding rule directs incoming traffic to the server’s local address. Check the destination address and port against the running server configuration.
- Apply the corresponding Killing Floor 2 rules. The game uses UDP/IP port 7707 for gameplay, UDP/IP port 7708 for queries and UDP/IP port 7717 as its GameSpy query port. The Master Server Browser connection may require both TCP and UDP traffic to be allowed. WebAdmin uses TCP/IP port 8075 when configured through
ListenPort. - Include the additional Killing Floor 2 forwarding ports. The guide recommends forwarding UDP ports 7777, 27015 and 20560 for a dedicated server, plus TCP port 8080. The example server connection uses port 7777. Don’t assume every port replaces the game’s configured port; match each rule to the service and settings in use.
- Check the firewall and router separately. On Windows, review the firewall rule for the server program and its required protocols. Then check the router’s NAT or port-forwarding rule. A correct Windows rule cannot forward traffic through a router, and a router rule cannot override a blocked port on the server.
- Test with the server’s actual address and port. For Killing Floor, enter the host’s IPv4 address with port 7707 in the console’s
opencommand. If the browser cannot find the server, compare its configured ports with the firewall and router rules. Also confirm that the server is running and that any WebAdmin password is separate from connection settings.
SteamCMD server requirements
SteamCMD downloads dedicated server files, making it a key tool in a Killing Floor server setup. A Steam account is required for the download. Choose the installation folder and game version first to keep the files and later updates organised.
- Install SteamCMD for your operating system. On Linux,
apt-get install steamcmdis one way to install it. Keep the SteamCMD program separate from the game server folder. This makes it clearer which files belong to the download tool and which belong to the server. - Choose a dedicated destination folder. Create or select a location for the server files before starting SteamCMD. Use a folder name that identifies the game, rather than a general downloads directory. This helps you select the right installation when maintaining more than one server.
- Use a Steam account for the download. An account may be needed to download the dedicated server files. Enter account credentials through SteamCMD’s sign-in process, and keep them private. Don’t put passwords in shared notes or command files that other users can read.
- Select the original Killing Floor app ID. Use app ID
215350when downloading or updating the original game’s dedicated server files. Check that SteamCMD points to the folder you selected for that installation. Keeping the app ID and destination together reduces the chance of updating the wrong server. - Choose the Killing Floor 2 app ID separately. The dedicated server for Killing Floor 2 uses app ID
215360. Direct its files to a separate folder from the original game. Before beginning, compare the game name, app ID and destination path as one final check. - Allow the download to finish before closing SteamCMD. Wait for the command process to complete, then review its final output for an error or interrupted task. If the session ends unexpectedly, return to SteamCMD and run the appropriate update operation for the same app ID and destination.
- Keep a short installation record. Record the game version, app ID and folder path together. For example, note that app ID
215350belongs to the original Killing Floor installation. This simple record helps you direct future maintenance and distinguish separate server copies. - Launch only after preparing the server files. SteamCMD supplies the dedicated server files, but installation alone doesn’t complete the Killing Floor server setup. Once the download finishes, continue with the correct configuration and launch settings for that game version. Keep the two installations separate when preparing both games.
Twisted Servers
Twisted Servers offers Game Server Hosting, VPS Hosting and Dedicated Server Hosting for different approaches to running a multiplayer server. If maintaining the machine, updates and network configuration is taking time away from your community, hosted infrastructure can be a practical next step. The right option depends on how much control you want over the server environment and how much setup you’re prepared to manage. For Australian players, a server location closer to them may help reduce latency compared with a distant overseas server, though results also depend on routing, internet provider and player location. Web Hosting is available separately for a community website; it isn’t a substitute for game server hosting. If you’d like to discuss your setup, contact Twisted Servers.
Plan your server’s next stage
A Killing Floor server setup also involves decisions about your community. Decide who will maintain the server, how you’ll agree on proposed changes and how you’ll inform players when the experience changes. A clear process helps keep the server aligned with what your group enjoys as the community develops. Consider whether to manage the server yourself or use a hosting service.
Twisted Servers offers Game Server Hosting, VPS Hosting and Dedicated Server Hosting. These options suit different approaches to running a server, from choosing game server hosting to considering VPS or dedicated infrastructure. Think about the level of control you want and how much server administration you’re comfortable managing before deciding what fits. You don’t need to make every long-term decision at once. Start with the arrangement that suits your community now, then reassess as its needs change. If you’re ready to discuss your next step, contact Twisted Servers. A well-planned setup gives your group a practical foundation to build on.
Frequently Asked Questions
Which ports must be opened for a Killing Floor server?
Open the ports required by your game version and the services you plan to use, then test each connection path separately. If players can join directly but the server doesn’t appear in the browser, troubleshoot browser visibility rather than changing gameplay settings. If external connections fail, compare the server’s active network settings with the firewall and router rules, and make sure both point to the same machine.
How do I configure Killing Floor server settings, maps, difficulty and player limits?
Edit the configuration file for the game version you’re running, then restart the server and test the change. Make one change at a time so you can identify its effect. For example, test a map change before adjusting other profile settings. If the live server doesn’t reflect an edit, check that you changed the active installation’s configuration, not a second copy.
How do I install mods and custom maps on a Killing Floor server?
Use your chosen method to manage custom content, and test each addition before including it in the regular rotation. Keep a copy of the working configuration and original files so you can restore them if an update causes a problem. After installing content, launch the server and check its output for loading errors. Test the selected map before inviting players to join.
Disclaimer
Game titles, trademarks, logos and related assets are the property of their respective owners. Twisted Servers is an independent hosting provider and is not affiliated with or endorsed by the developers or publishers of the games mentioned unless otherwise stated. Information is provided as a general guide and may change as games, software and hosting services are updated.

